Table of Contents

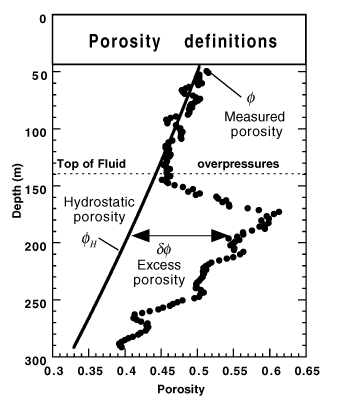
Porosity definitions used on ODP Leg 161 [From Revil et al., 1997 (10.2973/odp.proc.sr.161.274.1999)]
I. Introduction
Core specimens for moisture and density (MAD) analysis are extruded from a section half for:
- Mass: measured using a motion-compensating dual analytical balance system and a drying oven.
- Volume: measured using a caliper or by a helium displacement pycnometer that employs Archimedes' principle of fluid displacement to determine the volume of solid objects.
The MAD properties of interest are:
- Water content
- Bulk density
- Dry density
- Porosity
- Void ratio
These properties are calculated based on three out of four measured values:
- Wet mass
- Dry mass
- Wet volume
- Dry volume
Method Theory
Phase relationships of mineral density, porosity, void ratio, and water content are basic sediment and rock properties that are found most accurately through mass and volume determinations. The mass or volume of the bulk (wet) material, the dried material, and the extracted water (assumed to be interstitial pore fluid) is corrected for the mass and volume of salt evaporated during the drying process. The mass and volume of the evaporated pore water salts are calculated for standard seawater salinity, seawater density at laboratory conditions, and an average seawater salt density.
Soils can be either 2-phase or 3-phase compositions (i.e., completely dry or partially saturated). For MAD measurements the analyst determines whether the sample contains a 2- or 3-phase system:
- Completely dry soil contains 2 phases: solid soil particles and pore air.
- Fully saturated soil also contains 2 phases: solid soil particles and pore water.
- Partially saturated soil contains 3 phases: solid soil particles, pore water, and pore air.
MAD data provide a direct estimate of porosity and void ratio and the average density of constituent minerals. Porosity variations are controlled by consolidation and lithification, composition, alteration, and deformation of the sediments or rocks. MAD data can be used to calibrate high-resolution gamma ray attenuation (GRA) bulk density data, which are sampled at a much higher resolution than is possible with the MAD method. If mineral density can be defined with sufficient precision, GRA bulk density can be expressed as porosity.
II. Procedures
A. Preparing the Instrument
MADMax is a C# application that controls all of the measurements used in the MAD process. It can be found on the applications web page. Due to browser compatibility issues, MADMax must be installed from Microsoft Internet Explorer; any other browser is unlikely to install properly.
- Double-click the MADMax icon on the desktop (Figure 1) and login using ship credentials. MADMax main screen will open (Figure 2).
NOTE: If the user cannot login, please see a technician to ensure that the appropriate database authorization has been granted to the user account.

Figure 1. MADMax Icon.
2. The main screen of the application (Figure 2) is the central command center for the entire process. Various actions on this screen initiate the balance measurements, the pycnometer measurements, the entry of caliper data, and the calculation of the derived MAD results.
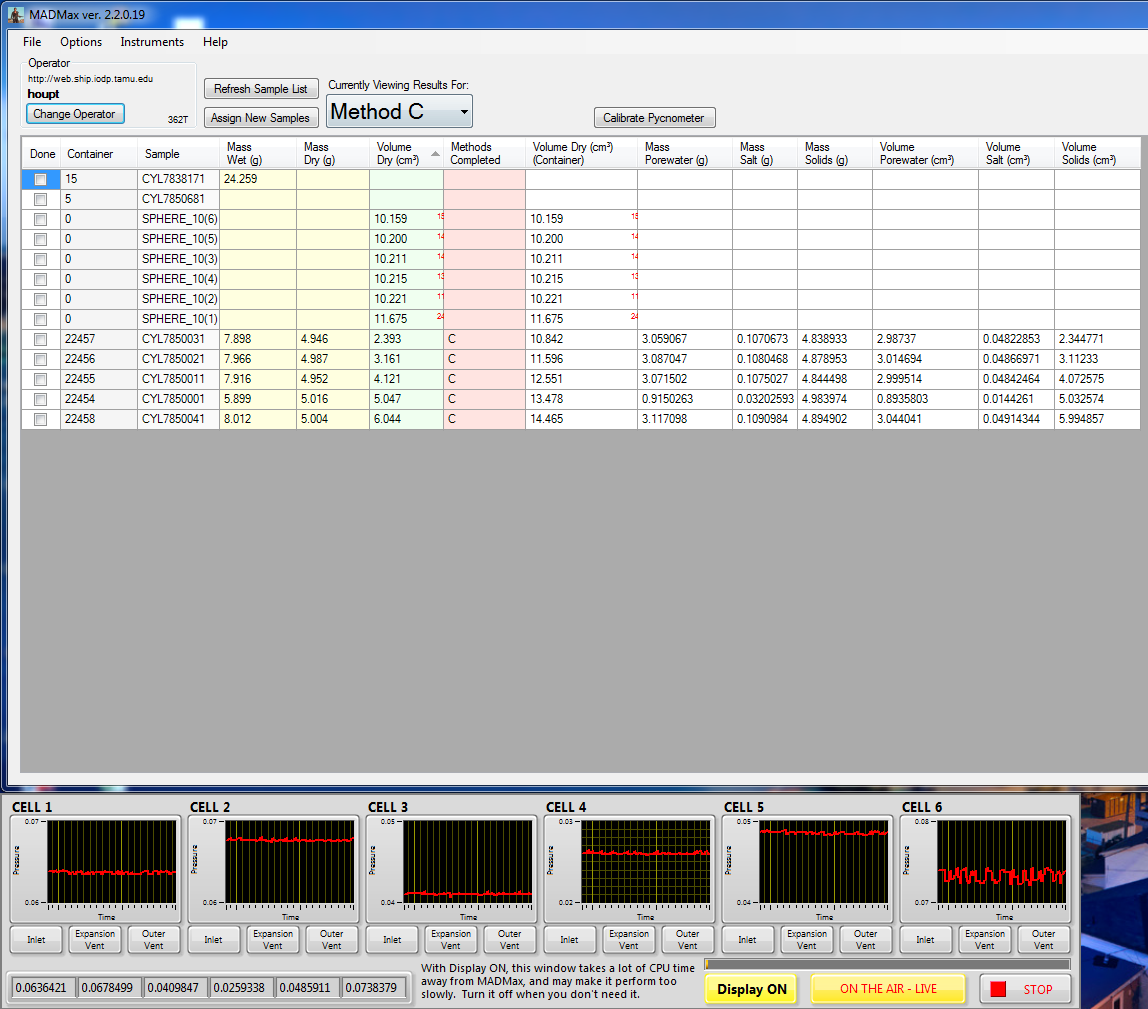
Figure 2. MADMax main screen. Note the pycnometer display screens below the main application window.
NOTE: It is possible to click the "Display ON" button to turn the live pycnometer monitoring off unless troubleshooting a problem. The live display is memory-intensive and will slow down the functioning of the software.
Once a sample has been assigned to a MAD vial using the Sample Master program, it will be available to the MADMax application. Click the "Refresh Sample List" button to cause the sample to appear in the table.
IMPORTANT! Note that once the samples are in the MAD vials, they are tracked solely by their container number. Care should be taken not to confuse the samples at any point in the process.
3. The main screen spreadsheet can be sorted by clicking on the column header, such as "Container". This will put all samples in order by container number.
B. Instrument Calibration
Calibration of the Pycnometer Cells
Before any pycnometer measurements can be made, the pycnometer cells must be calibrated. On the main screen, click the "Calibrate Pycnometer" button on the right side of the main screen in order to invoke the calibration window as shown in Figure 3.
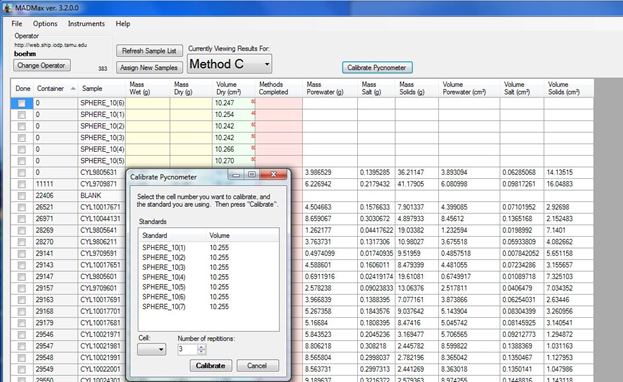
Figure 3. Calibrating the pycnometer cells.
First select the standard to be used in the calibration. For the 35 cm3 inserts (Wheaton vials and aluminum cups), the best results are obtained by using "SPHERE_10," which is actually a 3 cm3 and 7 cm3 standard used together. Once the standard is selected (again, the normal standard used is "SPHERE_10"), assign it to a pycnometer cell using the pull-down selector as shown in Figure 4. Use at least 3 repetitions for good precision between measurements. Select SPHERE_10(1) and assign to Cell 1, SPHERE_10(2) assign to Cell 2, and so on.
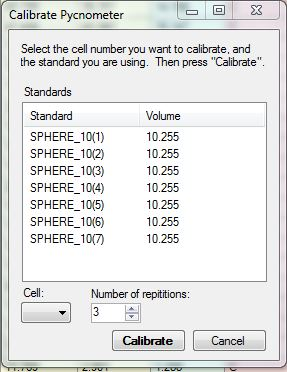
Figure 4. Selecting the standard and then assigning it to the cell.
Click "Calibrate" once the standard and the cell have been assigned and the number of replicates is chosen. A window will appear for the cell that was chosen as shown in Figure 5. The first calibration step is to measure the empty cell. Ensure that the cell is empty before clicking "Done". The measurement will start immediately. If calibrating multiple cells, click on Calibrate Pycnometer again to set up and start the next cell, all six can run simultaneously and at different steps in the measurement cycle. You will end up with 6 measurement windows on the screen.
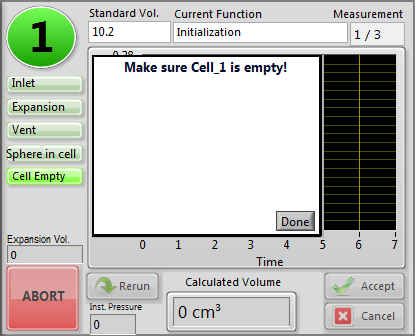
Figure 5. Cell 1 calibration window.
The pycnometer will step through its full measurement cycle once for each of the replicates selected (so three times if "3" was selected) as shown in Figure 6.
Figure 6. Pycnometer analysis steps.
The steps are detailed here:
- The purge pulse and release step will repeat as many times as the number of replicates prior to moving on to the analytical steps below.
- Purge (no.) Gas Pulse—fills the main chamber with helium
- Purge (no.) Release Gas—empties the helium through both chambers
- The following steps will repeat as many times as the number of replicates (without going back to the purge step).
- Stabilize—allows the chambers to come to equilibrium with each other after the purge step.
- Measure Atmospheric Pressure—measures the zero-point pressure in the analytical chamber (only).
- Initial Pressure—opens the helium inlet to fill the analytical chamber.
- Measure Initial Pressure—measures the initial pressure in the charged analytical chamber.
- Measure Expansion Pressure—opens the expansion valve and then measures the equilibrated pressure in the analytical plus expansion chambers.
- Exhaust Cell—releases the helium from both chambers.
Once the empty cell has been measured the specified number of times, the unit will prompt the user to add the standard(s) to the cell; the "SPHERE_10" standards are found in the wooden box shown in Figure 7. Open the pycnometer cell and place the standard ball(s) into the cell, then close securely. Clicking "Done" will trigger the above analytical steps, including purges, for the standard ball(s). After the replicate measurements on the steel ball(s) are done, the system will prompt the user to remove the standards from the cell. Pressing done at this point shows the expansion (red circle) and analytical cell (black circle) volumes determined by the calibration experiment as shown in Figure 8.
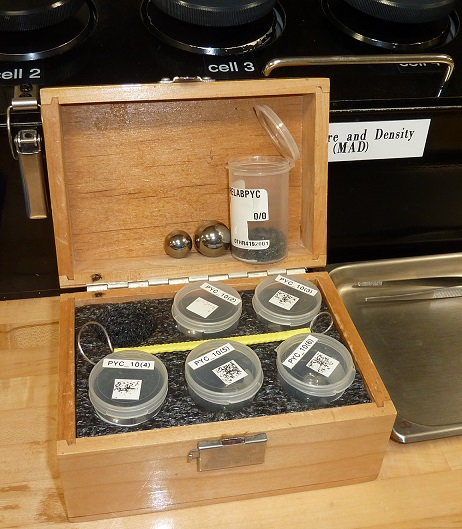
Figure 7. Six sets of steel balls are kept in this box along with the wire tool to extract them from the cells.
Note: Do not touch the spheres with bare fingers! Fingerprints don't significantly affect the volume measurement, but will cause the spheres to begin corroding. Wipe them thoroughly off with a Kim-Wipe if it is necessary to do so.
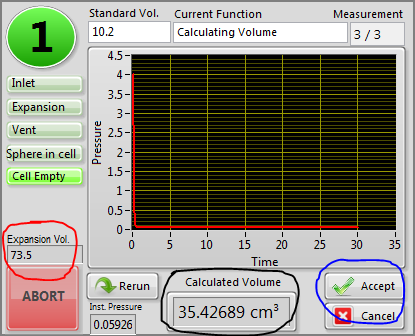
Figure 8. Final calibration screen for the pycnometer cell.
Click the "Accept" button (blue circle) to complete the calibration process for this cell. Once a cell's calibration is completed the pycnometer measurement on unknowns (i.e., samples) can be started independently of the other cells undergoing calibration.
To check the calibration, run the same set of standards as a sample. Double click on the spreadsheet in the green column (“Volume Dry”) for the cell and sphere you want to test. You may need to click “options” and select “include complete MAD tests” to display all samples. The Calculated volume should be between 10.098-10.302. Enter the value in the calibration excel spreadsheet on the desktop. The spreadsheet is conditionally formatted where if the standard volume is out of this range it will turn red. That means something is wrong and the cell needs to be calibrated again.
Always use the standards that are labeled for the corresponding cells. The standard containers are labeled 1-6 to match up will cells 1-6.
Frequency of Calibration/Calibration Check Standards
The pycnometer has proven to be quite stable, so the standard practice is to calibrate the instrument at the beginning of an expedition. To ensure quality, each set of five samples should be accompanied by a standard rotated through the cells. So long as the standards continue to give an acceptable value (less than 0.5% deviation), recalibration is not necessary (NOTE: As of X375 the recommendation is to Calibrate the beginning of each shift, and then +/- 0.5% deviation).
Rotation of the check standards through the cells is important, however, to ensure on a continuing basis that the system is still stable and functioning properly. An example measurement plan is given here:
- Measure a sample in Cell 2, 3, 4, 5, and 6. Measure the 10.2 standard (3 cm3 + 7 cm3 balls) in Cell 1.
- Measure a sample in Cell 1, 3, 4, 5, and 6. Measure the 10.2 standard in Cell 2.
- Measure a sample in Cell 1, 2, 4, 5, and 6. Measure the 10.2 standard in Cell 3.
- Measure a sample in Cell 1, 2, 3, 5, and 6. Measure the 10.2 standard in Cell 4.
- Measure a sample in Cell 1, 2, 3, 4, and 6. Measure the 10.2 standard in Cell 5.
- Measure a sample in Cell 1, 2, 3, 4, and 5. Measure the 10.2 standard in Cell 6.
- Repeat pattern.
The SPHERE_10 standard fills the 35 cm3 chamber to the fullest degree and will give the best precision in measurements. Using a smaller standard will result in a larger headspace and a lower pressure drop, and therefore lower precision.
Use the air hose behind the pycnometer to clean out any dust and debris that gets in the cells. Check o-ring on the cell lids for any damage or dirt.
C. Set Measurement Parameters
- Selecting the Appropriate Analysis Sub-method
The user needs to decide which sub-method (A, B, C, or D) should be used for the MAD analysis. The choice depends primarily on the type of sample material to be measured. In addition, Sub-methods A and B are not recommended from an analytical quality point of view. To choose between C and D based on the following criteria:
- Fine-grained, saturated sediments or fine-grained igneous material: Sub-method C
- Porous rocks (e.g., vesicular basalt and limestone) that cannot be confidently saturated: Sub-method D
Saturation state of sample: | Saturated | Unsaturated | Soft, Saturated | Saturated |
MAD analysis sub-method: | C | D | A | B |
Is sub-method recommended?: | YES | YES | NO | NO |
MAD Measurement (LIMS Analysis) | ||||
Wet Volume (CALIPER) | X | X | ||
Wet Volume (PYC) | X | |||
Wet Mass (MAD_MASS) | X | X | X | |
Dry Mass (MAD_MASS) | X | X | X | X |
Dry Volume (PYC) | X | X | ||
MAD Method C is the most common one used on the JOIDES Resolution. The MADMax application defaults to the "Method C" mode. The method indicator is a pull-down menu to switch between the four methods A, B, C, and D.
Regardless of method, the user can make up to five discrete types of measurements:
- Wet mass determination by analytical balance
- Dry mass determination by analytical balance
- Dry volume determination by pycnometer
- Wet volume determination by pycnometer (not recommended)
- Wet or dry volume determination by precision caliper
Depending on the method selected, different actions will be available by double-clicking on the color-coded section of the main screen appropriate to the method. For example, to make a wet mass measurement on a sample, double-click on the left-hand yellow cell as shown in Figure 9. This action will invoke the balance control software portion of MADMax.
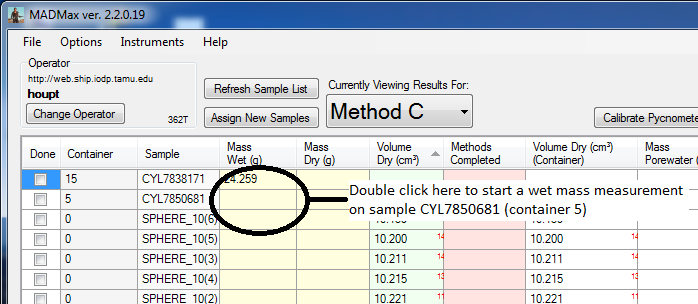
Figure 9. Activating a wet mass measurement.
2. Order of Actions by Method
For each method, the measurements should be done in a specific order, as given below. Note that the MADMax interface does not sort these columns by this order, but the columns can be rearranged to do so if the user wishes.
- Method A: Wet volume (caliper), wet mass (balance), dry mass (balance)
- Method B: Wet mass (balance), wet volume (pycnometer), dry mass (balance)
- Method C: Wet mass (balance), dry mass (balance), dry volume (pycnometer)
- Method D: Wet volume (caliper), dry mass (balance), dry volume (pycnometer)
In Method D's case, "wet volume" is better stated as "bulk volume," because the method is used only for samples with such high porosity that the water cannot be kept inside the sample (e.g., vesicular basalt or corals).
Figure 10 shows all of the methods and the required measurements for each one. Note that the colored columns for the measurements (yellow for balance, green for pycnometer, and blue for caliper) are slightly different for each method. The pink Methods Completed column is the same for each method and will be discussed later in the MAD Calculations section.
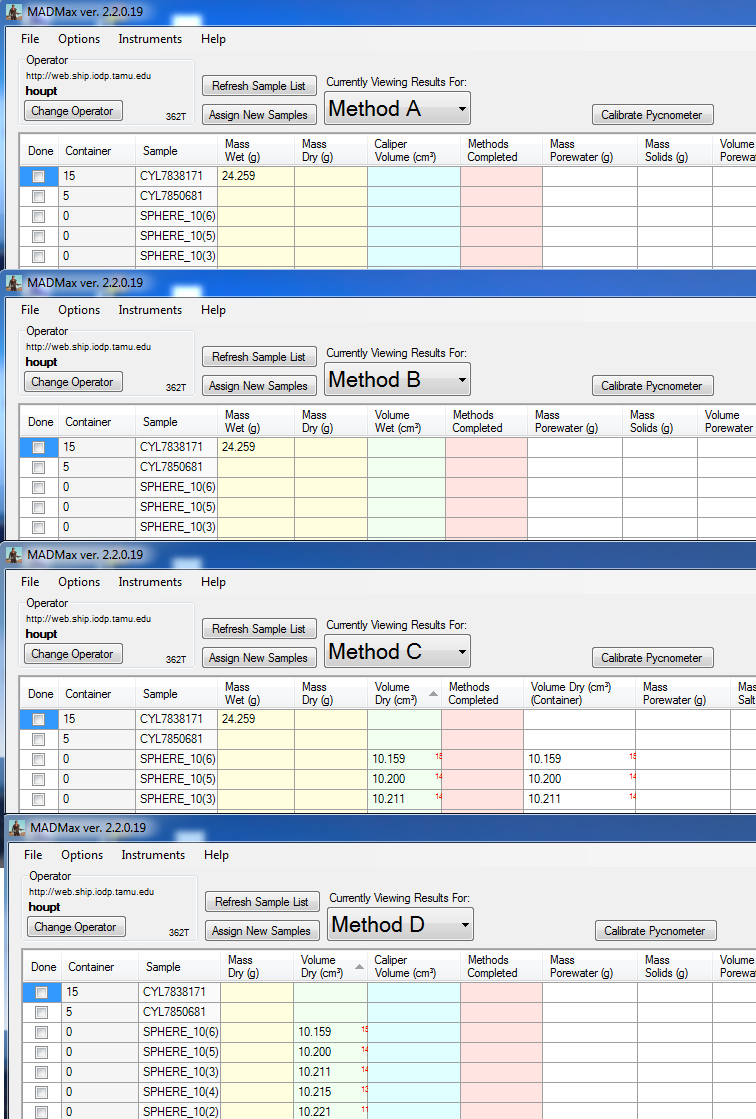
Figure10. All of the MADMax methods shown in cascade style.
D. Preparing Samples
Sediment Samples
Sampling Tools
- For soft materials, syringes/plugs are used to extract sediment samples with a nominal volume of 10 cm3 from the section halves (Figures 11 a-b).
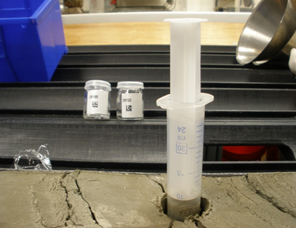
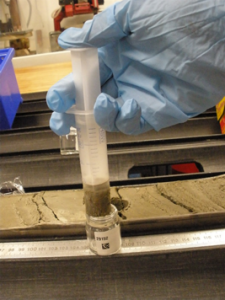
Figure 11a. Using cut-off syringe to get a 10ml sample. Figure 11b. Pushing sample out of syringe into assigned container, clean off debris around rim with a kim wipe. - For hard materials, it is necessary to use drills and saws to cut cylindrical and rectangular prism-shaped rock samples; this is done in the core splitting room.
Sample Containers
Sample containers for the MAD analysis are either glass Wheaton vials or anodized aluminum cups (Figure 12). Each of them has a numeric identifier that is used to track the container and its sample throughout the process. Each container's mass and volume are recorded in the database and the MADMax program uses these values to subtract the container mass and volume from the sample values. Boxes of pre-weighed Wheaton vials are on the inventory list and must be checked out.
- Wheaton type 800 vials are used for soft to indurated sediment samples; basically if it fits in the glass vial, use a glass vial. The glass vials have a density of 2.48-2.50 g/cm3 and their volume has been calculated from the mass determined on shore prior to shipment; their mass is approximately 21 grams and volume is about 8.3 cm3.
- Anodized aluminum sample cups are used for igneous or consolidated sedimentary samples. The mass of each of the cups was determined experimentally (approximately 14.8 g) and the volume of 5.842 cm3 was estimated from the dimensions and confirmed by experiment.
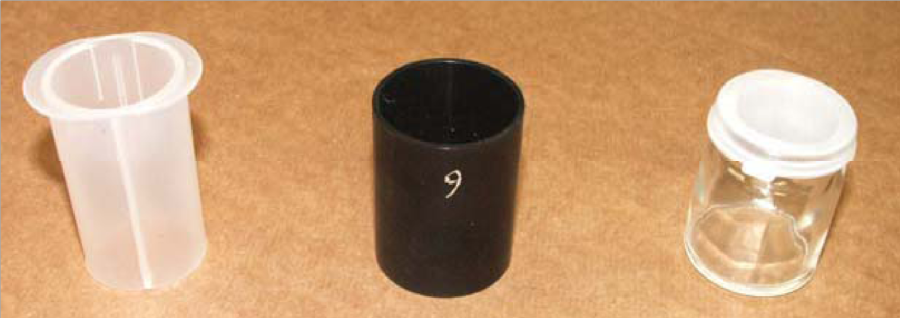
Figure 12. Sampling tool (left), aluminum cup, and Wheaton vial for MAD measurements.
Hard Rock Saturation Method
- Take a sample cube from the working section half, it is common to use the same size dimensions as a p-mag cube (or to share the same sample as long as scientists understand the measurement is destructive).
- Hard rock samples do not require a vial and therefore use container ID “0” when entered.
- Place the sample cube into a snap cap vial and fill until sample is covered with seawater.
- All hard rock samples need to be saturated completely before running them through the MAD measurements. To do this, all samples will need to be placed in a vacuum for at least ~12hrs, preferably 24hrs.
- To set up the vacuum, the vacuum bowl is filled with seawater before setting up the remaining components.
- Connect the bowl to a vacuum hose that runs through the drain flask, this keeps any water getting to the pump. Place the stopper with the copper tubing in the top of the flask before directly connecting with tubing to the pump.
- Once this is set up, the pump can be turned on to pressurize the vacuum bowl, it is recommended to run the pump intermittently during saturation, about 30 minutes at a time every 4 hours.
- Once the samples have been under vacuum for the allotted time, they can be weighed for wet mass and placed in the oven to dry at 110C.
- After 24 hours, the samples are then weighed for dry mass.
- The hard rock sample can be placed directly into the pycnometer for measurement.
If the container ID was not entered as “0” in SampleMaster the User can add the container ID directly in MADMax by double clicking in the container cell that directly correlates with the desired sample.
E. Making a Measurement
Wet Mass Determination by Analytical Balance
As shown in Figure 9, above, double-click on the "Mass Wet (g)" column in the field adjacent to the sample to be analyzed. This will invoke the Balance Measurement dialog box as shown in Figure 13. The container number and the full Label ID of the sample will be displayed to ensure the correct sample was selected. Select the number of measurements to average (at least 300 is recommended, more if the sea state is high) and click "Measure." The measurement speed of the XS-204 balances is 5 Hz, so 300 measurements will take 60 seconds. The next screen will appear (Figure 14).
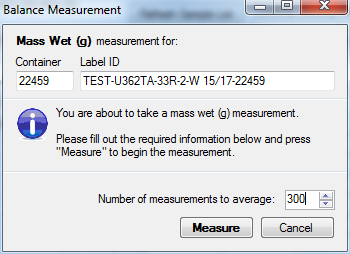
Figure 13. Balance Measurement dialog box. A typical expedition Label ID would be formatted as follows: 360-U1473A-21R-2-W 10/12-20127.
Taring the Balances
The first step to be taken is to tare the balances; measure the tare with empty pans. This step measures the differential tare between the two balances and is used to create a motion-compensated tare value. Do not try to tare the balances by using the Tare button on the keypad; the balances must be tared using the software. The window header will show the Text ID of the sample, what measurement is being done (e.g, "Mass Wet (g)"), and the container number.
Activate the tare function by clicking the "Tare" button on the upper left-hand corner of the screen (circled in green) and the tare will begin. The reference balance trace is green, the unknown balance trace is red, and the corrected mass (in this case the tare value) is a blue trace.
The balances should be tared relatively often as many things can affect the balance reading. The most common causes of these changes are:
- Spilling something on the balance pan (and please don't leave it there!)
- Cleaning something that was spilled on the balance pan
- Temperature changes in the laboratory may affect the zero point of each balance
It is recommended that the user tare no less frequently than 6 hours, but certainly if the user suspects anything may have changed on either balance.
After a tare, check by placing a known weight (20g) on both balances and click "Weigh". The corrected value should read 20g. If not, take a new tare.
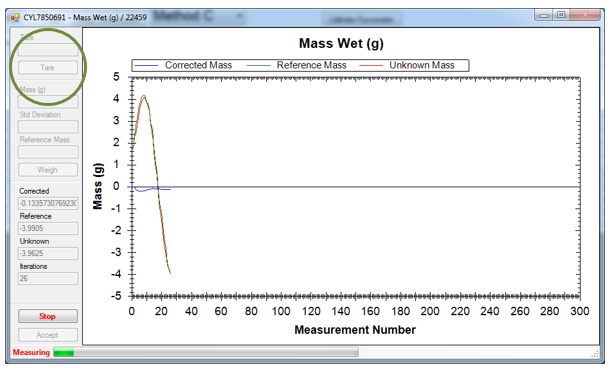
Figure 14. Taring the paired balances at 300 measurements.
Making the Measurement
Once the tare is complete, place the sample container on the unknown balance and close the sliding door. Place counterweights from the standard box as close to the mass of the unknown as possible and close the reference balance door. It may be useful to look at the balance LCD screens; the circle shows the rough load on the balance and masses can be roughly equalized by using them. It is important to get the masses within 5 grams. If the red and green traces are more than 5 grams apart after the measurement is started, then press the "Stop" button, add or subtract reference masses, and start the measurement over.
The "Reference Mass" field should be filled with the total mass of the reference masses before the measurement is started. Figure 15 shows the Reference Mass (circled in blue) and the traces of the two balances and their corrected result mass. Note that the reference mass balance began at a value of just under 19 grams and the unknown balance started close to 21 grams; the difference between them is ≤5 grams, so this measurement could be allowed to continue.
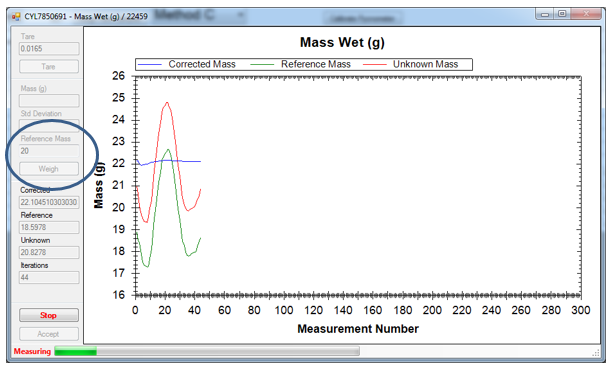
Figure 15. Mass measurement on a sample.
Once the analysis is completed (Figure 16), the mass determined by the measurement process will be displayed (in this case 22.120 grams). The "Tare" button is active again, but it not appropriate to use it at this time without removing the sample and reference masses. The user has three choices: accept the result and send it to the main screen display and the LIMS database by clicking the "Accept" button, reweigh the mass by clicking the "Weigh" button again, or completely cancel the measurement and discard all results by clicking the "Cancel" button.
The user should note that the instantaneous values of the balances varied by more than 20 grams in this example because of ship's heave, but the measured mass (22.110 grams of known masses) was accurate to within 0.010 grams.
Note: At the time of writing this manual, the Std Deviation field is recording the standard deviation of the unknown mass measurement (which obviously varies highly). An upcoming upgrade will switch this to the corrected mass value. Has been done?
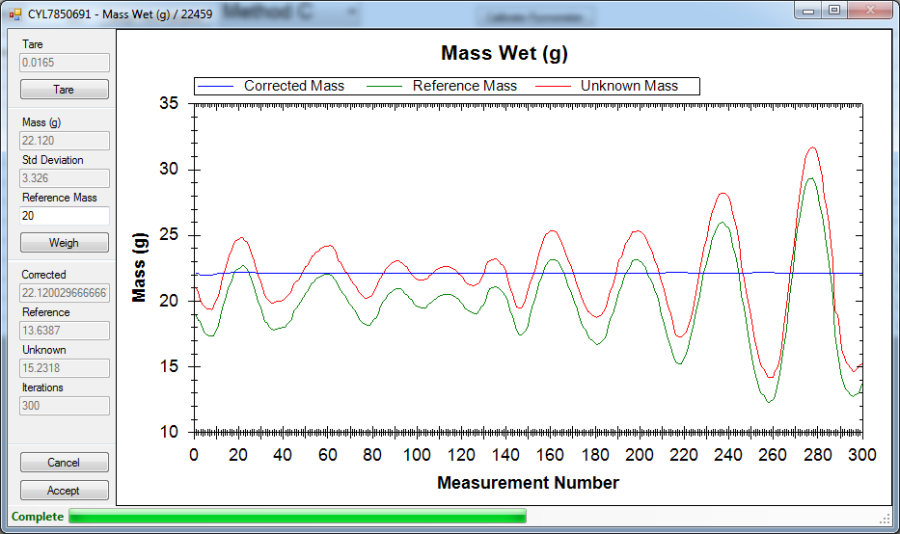
Figure 16. Completed measurement.
Once the "Accept" button is pressed, the user is returned to the main MADMax screen.
Reassigning Results
The result should be in the appropriate field, but in case the user double-clicked the wrong mass measurement, MADMax provides the capability to switch the mass measurement from "wet" to "dry" and vice-versa. As shown in Figure 17, right-click the mass cell and select the "Swap the result with Mass Dry (g)" option. If two masses are already present, this option will instead state "Swap Mass Dry (g) and Mass Wet (g)" to swap the mass measurements.
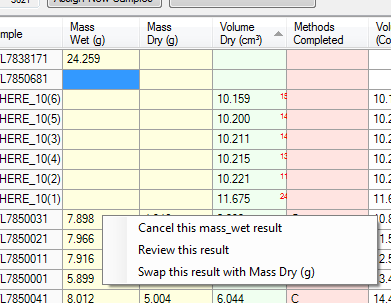
Figure 17. Right-click options for the mass measurement.
Once the user clicks the "Swap" options, a window will pop up to confirm the action as shown in Figure 18; the window for moving a result from wet-to-dry or dry-to-wet is very similar.

Figure 18. Reassign Result window. It is important to be able to do this as the drying
step is irreversible and the wet mass cannot be repeated without taking a new sample.
Cancel Mass Result
The user can also cancel a result using the same right-click option, with a confirmation window as shown in Figure 19. A technician can uncancel the result if this was done in error.
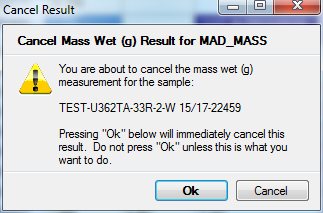
Figure 19. Cancel mass result pop-up window.
Review Results
If the user wishes, they can also look at the details of the mass results as shown in Figure 20. This is a summary of all of the parameters used to determine both the wet and dry masses with the parameters labeled by their database names.
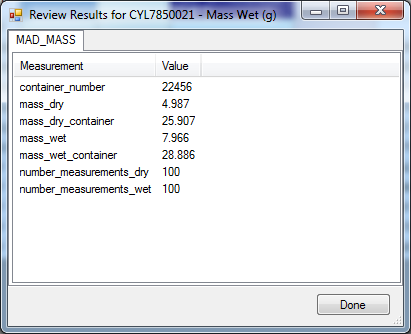
Figure 20. Review wet mass results window.
The mass_dry and mass_wet components are the mass of the sample. The mass_dry_container and mass_wet_container components are the mass of the sample and the container together.
Dry Mass Determination by Analytical Balance
Put samples in the oven, uncovered, for at least 24 hours at 105°C . Let them cool to room temperature in the dessicator boxes for about 3 hours before placing inside pycnometer cells.
This step is performed the same way as the wet mass determination. Double-click on the "Mass Dry (g)" column in the field adjacent to the sample to be analyzed. Follow the rest of the instructions in Wet Mass Determination by Analytical Balance, except that it applies to the dry mass measurement.
Dry Volume Determination by Helium Pycnometer
Making a Pycnometer Measurement on a Sample
After calibration is complete, the user can begin analyzing samples and one standard per six runs as noted above. Double-click on the Volume Dry (cm3) portion of the main screen next to the sample to be studied; normally the SPHERE_10 standards are also listed for the one cell in six to be dedicated for a standard measurement. A window will appear as shown in Figure 21 prompting the user to select a cell and to set the number of replicates. It is recommended to use the same number of replicates as the calibration.
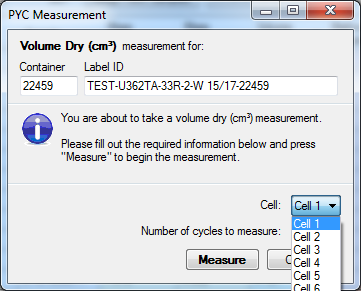
Figure 21. Pycnometer measurement window.
Important! Ensure that the sample is correct and select the cell to be used and the number of replicate measurements to be performed.
Once the user has selected the cell and number of cycles, click the "Measure" button, which will open the pycnometer cell control window (Figure 22). Place the sample container in the cell using long tweezers and do not put the cap on the container (Figure 23). Screw the lid back on the cell and then click "Done" followed by clicking the "Start" button (circled in blue). Unlike the calibration measurement, the experiment will not start until the "Start" button is clicked.
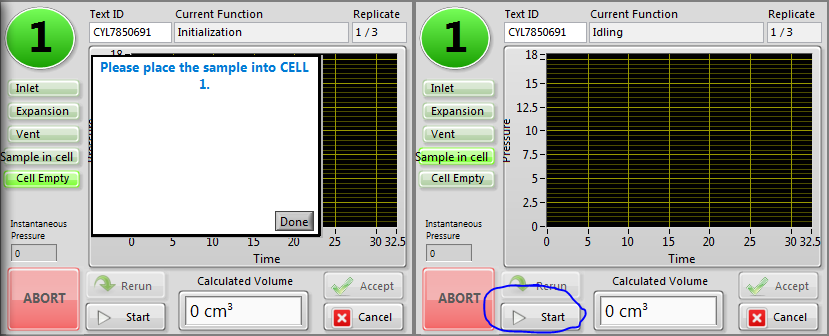
Figure 22. Starting a pycnometer measurement on a sample.
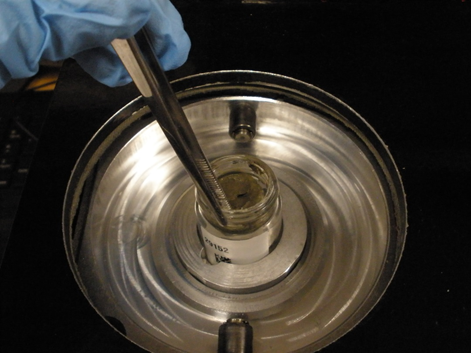
Figure 23. Loading the sample container into the cell.
The pycnometer will step through the same purge and measurement steps described in the calibration section and when it is finished, will show the screen shown in Figure 24.
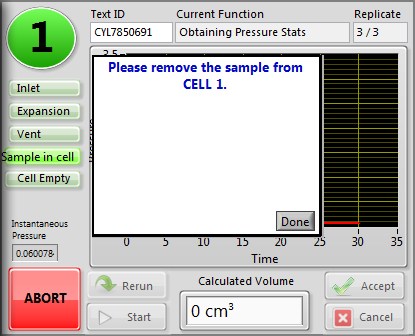
Figure 24. Sample completed indicator for pycnometer.
Once the "Done" button is clicked, the volume of the sample (including the volume of the container) will appear in the "Calculated Volume" window. At this point, the user may select "Rerun," which will redo the measurement, "Cancel" to reject the measurement, or "Accept" to keep the data and transfer it to the main screen.
Making a measurement on a mini-core sample
A special aluminum insert (Figure 25), as pictured below on the right, was made to accommodate longer samples that will not fit into the normal insert. It is located in a labeled zip-lock in the pycnometer drawer in the lab. The procedures and calibration are exactly the same as with the normal inserts. When swapping to this insert run a calibration right away with the standard that corresponds to the cell used, and run the standard as a control sample every sixth measurement. When swapping back to the regular insert make sure to calibrate it again before using.
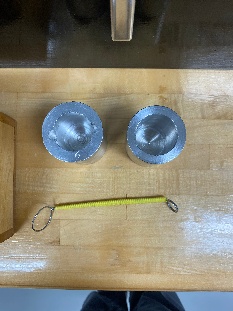
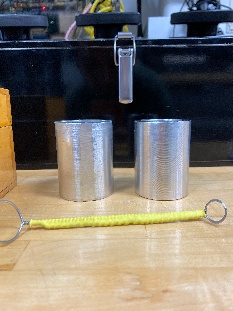
Figure 25. Mini-core aluminum insert.
Reassigning Results
The result should be in the appropriate field, but in case the user double-clicked the wrong volume measurement, MADMax provides the capability to switch the volume measurement from "wet" to "dry" and vice-versa. As shown in Figure 26, right-click the mass cell and select the "Send this result to the Volume Wet (cm3)" option. If two volumes are already present, this option will instead state "Swap Volume Wet (cm3) to Volume Dry (cm3)."
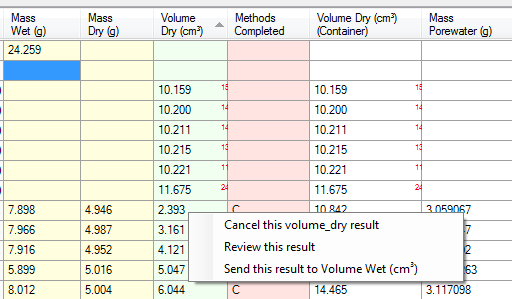
Figure 26 Right-click options for the volume measurement.
Once the user clicks the "Swap" options, a window will pop up to confirm the action, similar to that for the swap mass measurements window.
Cancel Volume Result
The user can also cancel a result using the same right-click option, with a confirmation window similar to the one for canceling mass measurements mentioned earlier. A technician can uncancel the result if this was done in error.
Review Results
If the user wishes, they can also look at a detail of the mass results as shown in Figure 27. This is a summary of all of the parameters used to determine the volume with the parameters labeled by their database names.
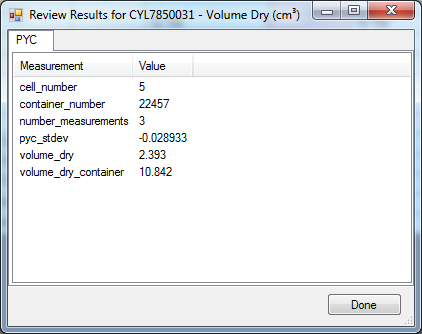
Figure 27. Review dry volume results window.
The volume_dry component is the volume of the sample. The volume_dry_container component is the volume of the sample and the container together. The pyc_stdev value is calculated from the individual measurements (in this case, three) done by the pycnometer.
Volume Determination by Caliper
Volume determination by caliper is best used on consolidated, high-porosity samples (e.g., coral or vesicular basalt) as part of Method D. It is not likely to give accurate results when used on soft sediments (Method A).
Double-click on the "Caliper Volume (cm3)" column in the field adjacent to the sample to be analyzed. This will invoke the caliper measurement window as shown in Figure 28. The user should select cube or cylinder depending on the sample to be measured with the precision caliper.

Figure 28. Caliper measurement entry screens.
Ensure that the sample being measured is the correct one and click either the "Cube" or "Cylinder" radio button. Make the measurements using the precision caliper (Figure 29). Enter the measurements for each dimension in centimeters. Once the measurements have been entered, click "Ok" and the result will be transferred to the main screen.
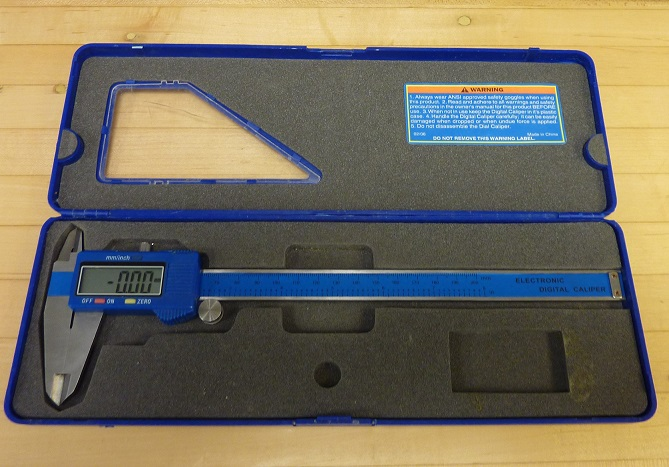
Figure 29. Digital caliper used for volume measurements.
Review Results
Right-clicking the caliper result will allow the user to select "Review Results" to see details of the measurement.
Cancel Result
The right-click window also gives the user the ability to cancel the result. A developer or technician can uncancel the result if this was done in error.
Wet Volume Determination by Helium Pycnometer
NOTE: This method (part of MAD Method B) is not recommended as water vapor will be produced from the wet sample and negatively affect the data quality!
However, if the user wishes to perform this analysis, use the same guidelines as found in Dry Volume Determination by Helium Pycnometer, above.
MAD Calculations
The MADMax software will calculate all of the other MAD parameters once any three of four measurements are completed: wet mass, dry mass, dry volume, and wet volume. Once the three measurements related to the chosen method (e.g., Method C: wet mass, dry mass, dry volume) are completed, double-click on the "Methods Completed" field on the line of the sample in question. This will invoke the MAD calculation window as shown in Figure 30.

Figure 30. Run MAD Calc window. Ensure the proper sample is shown.
Click on the "Run MAD Calc" button and after a brief pause, the calculated parameters for the MAD analysis will appear on the main screen for that specific sample and will be updated in the LIMS database at the same time. See the "MAD Computations" section below for more information about the various parameters determined by the software.
Cleaning Up the Main Screen
After the MAD calculation is run, the user may wish to clean up the main screen list of samples. This is done by clicking in the "Done" boxes as shown in Figure 31. Once the samples to be removed are checked, click the "Refresh Sample List" button and the checked samples will disappear. (Any new samples will also appear.)
Note: Until this step is completed, two (and rarely three) lines will appear in the LIMS reports. Once this step is completed, the extra lines will be canceled.
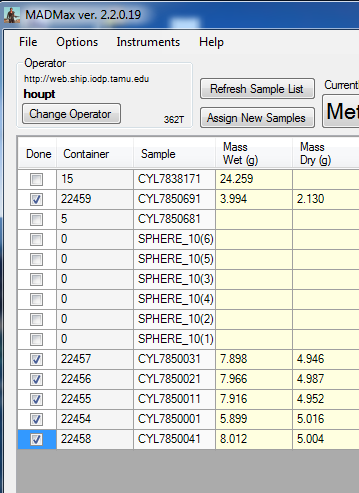
Figure 31. Using the "Done" check boxes to clean up completed samples.
F. Quality Assurance/ Quality Control
QA/QC for MAD analyses consists of instrument calibration and continuing calibration verification for accuracy determination. The analytical balance calibration is checked by JRSO technical staff and verified by weighing reference masses. The pycnometer system is calibrated using precision ball bearings and verified with calibration verification experiments.
Analytical Batch
The user is encouraged to treat each group of five samples as an analytical batch and to carry a QC sample through the pycnometer process as the "sixth" sample. Thus, each pycnometer batch will consist of five samples and one calibration verification sample.
For the balance and caliper, the accuracy and precision of the equipment can easily be determined by measuring standards and confirming the system is giving proper numbers.
Precision and Accuracy
Each science party must define what error is acceptable for measurements, but the JRSO has some guidelines as to what can be expected.
Balance
For repeated mass measurements, we expect the data to be reproducible within 0.005 g; this will be significantly higher if the sea state is rough, the weights on the two balance pans are not roughly equal, or the number of measurements is too low. In other words, if the masses on the reference and unknown balances are within 5 grams of one another and the number of measurements is sufficient for the sea state, then we expect measurement of a reference mass to be within 0.005 grams.
Pycnometer
On dry samples or the steel ball bearings when the sample container is nearly full, we expect 1% or better precision between measurements. Reproducibility will go down severely if the sample container is not filled, and even more so if wet samples are measured. Accuracy is expected within 1% of the indicated volume if conditions are correct (dry sample, container nearly full).
Caliper
The precision caliper is capable of measurements accurate to 0.01 mm ± 0.01 mm. However, the source of error in this measurement is largely from the quality of the sample being measured. If the rectangular prism's sides are not end parallel to one another, or if the cylinder is not a right cylinder, the error can be significant.
III. Uploading Data to LIMS
A. Data Upload Procedure
Data is automatically uploaded into LIMS once the MAD calc is complete (this includes any recalculation).
Data File Formats
Analyses in the context of the Laboratory Information Management System (LIMS) are defined based on the data acquisition systems that provide sets of data. The MADMax software application captures the data from all three types of analysis. For the MAD group of analyses, these are as follows.
Caliper analyses (CALIPER): Volume is calculated after measuring the sample's geometric dimensions using micrometer calipers.
Pycnometer analysis (PYC): Sample volume is measured using a helium pycnometer.
MAD mass analysis (MAD_MASS): Wet or dry mass is measured using the motion-compensating dual balance system.
- "Wet" refers to the saturated (undrained) state of a sediment or rock sample
- "Dry" refers to the state after drying 24 hr at 105°C and holding in the desiccator 2–3 hr.
MAD analysis (MAD): This set of calculations is applied as appropriate for each sub-method.
B. View and Verify Data
Data Available in LIVE
The data measured on each instrument can be viewed in real time on the LIMS information viewer (LIVE).
Choose the appropriate template (Ex: PHYS_PROPS_Summary), Expedition, Site, Hole or the needed restrictions and click View Data. The requested data will be displayed. You can travel in them by clicking on each of each core or section, which will enlarge the image.
Data Available in LORE
MAD (Moisture and Density) data are displayed under the Physical Properties heading. The expanded reports include the linked original data files and more detailed information regarding the measurement.
CONTAINER Analysis: Sample Container
Analysis component | Definition | Unit | Explanation |
container_number | Container number | — | Sample number for a specific container recorded in LIMS. The container number is supplied in the SAMPLE.NAME field. Sample number guarantees uniqueness. Written labels are reusable. |
material_type | Container material | Material the container is made of. | |
mass | Container mass | g | Mass of container. |
density | Container density | g/cm^3 | Density of container material used to compute the volume of container material. |
volume | Container material volume | cm^3 | Volume of container material computed from its mass and density; NOT the volume the container contains. |
MAD_MASS Analysis: Mass Determination for MAD Analysis
Analysis component | Definition | Unit | Explanation |
mass_wet | Mass of wet sample | g | Mass of the bulk sample, including the mass of the porewater, solid material, and dissolved salt. |
mass_wet_container | Mass of wet sample + container | g | Mass of the bulk sample, including the mass of the porewater, solid material, dissolved salt, and container. If one-way containers are used, this does not include the mass of the lid of the container. |
mass_dry | Mass of dry sample | g | Mass of the dried sample, including mass of evaporated salt. |
mass_dry_container | Mass of dry sample + container | g | Mass of the dried sample, including evaporated salt plus the mass of the container. If one-way containers are used, this does not include the mass of the lid of the container. |
container_number | Container number | — | Sample number for a specific container recorded in LIMS. The container number is supplied in the SAMPLE.NAME field. Sample number guarantees uniqueness. Written labels are reusable. |
CALIPER Analysis: Caliper Measurements for MAD Analysis
Analysis component | Definition | Unit | Explanation |
volume | Sample volume | cm^3 | Sample volume calculated from length, width, and height or height and diameter, depending on geometry. |
geometry | Sample geometry | — | Geometry used to calculate volume: rectangular prism or cylinder. |
length | Sample length | cm | Length (x) of a rectangular prism sample; measure orthogonally to the other dimensions. |
width | Sample width | cm | Width (y) of a rectangular prism sample; measure orthogonally to the other dimensions. |
height | Sample height | cm | Height (z) of a rectangular prism or cylindrical sample. |
diameter | Sample diameter | cm | Diameter of a cylindrical sample. |
container_number | Container number | — | Number inscribed on the container and logged into the LIMS. |
comment | Comment | — | Comment about caliper measurement. |
PYC Analysis: Pycnometry for MAD Analysis
Analysis component | Definition | Unit | Explanation |
volume_wet | Volume of wet sample | cm^3 | Volume of wet sample measured in pycnometer. NOTE: Wet volume measurement by pycnometer is not accurate and is not recommended. |
volume_wet_container | Volume of wet sample with container | cm^3 | Volume of wet sample and the container measured in pycnometer. NOTE: Wet volume measurement by pycnometer is not accurate and is not recommended. |
volume_dry | Volume of dry sample | cm^3 | Volume of dry sample including evaporated salt. |
volume_dry_container | Volume of dry sample with container | cm^3 | Volume of dry sample including evaporated salt and volume of container. |
pyc_stdev | Standard deviation | cm^3 | Standard deviation calculated from N measurement cycles in the pycnometer. |
number_measurements | Number of measurements | — | Number of successive measurements used in determining the result value. |
container_number | Container number | — | Sample number for a specific container recorded in LIMS. The container number is supplied in the SAMPLE.NAME field. Sample number guarantees uniqueness. Written labels are reusable. |
volume_container | Volume of container material | cm^3 | Volume of container material calculated from premeasured mass and material density of the container. |
cell_number | Cell number | — | Number of the cell in the pycnometer used for this measurement. |
temperature | Cell temperature | °C | Temperature of the pycnometer cell. |
comment | Comment | — | Comment on pycnometer run. |
PYC_QAQC Analysis: Pycnometry Calibration
Analysis component | Definition | Unit | Explanation |
volume_cell_standard | Volume of cell with standard | cm^3 | Volume of the cell as computed with the standard. |
volume_cell_exp | Volume of expansion cell | cm^3 | Expected volume of the cell (calibration). |
cell_number | Cell number | — | Number of the cell in the pycnometer used for this measurement. |
number_measurements | Number of measurements | — | Number of successive measurements used in determining the result value. |
volume | Measured volume of standard | cm^3 | Volume of standard used for calibration or calibration verification. |
container_number | Container number | — | Serial number for a specific container recorded in LIMS. The container number is supplied in the SAMPLE.NAME field. |
measurement_type | Calibration (verification) | — | Purpose of the measurement: calibration or calibration verification. |
temperature | Cell temperature | °C | Temperature of the pycnometer cell. |
comment | Comment | — | Comment on pycnometer run. |
MAD Analysis: Computed Results for MAD Analysis
Analysis component | Definition | Unit | Explanation |
moisture_rel_wet | Moisture content (wet) | %mass | Moisture content of sample in percentage mass of water/mass of bulk sample (includes moisture and dissolved salt). |
moisture_rel_dry | Moisture content (dry) | %mass | Moisture content of sample in percentage mass of water/mass of dry sample (without evaporated salt). |
density_bulk | Bulk density (MAD) | g/cm^3 | Grams of mass/mL of volume of bulk sample. |
density_dry | Dry density (MAD) | g/cm^3 | Grams of mass of solids (including evaporated salt)/mL bulk sample. |
density_grain | Grain density (MAD) | g/cm^3 | Grams of mass of solids (without mass of evaporated salt)/mL solids (without volume of evaporated salt). |
porosity | Porosity (MAD) | %vol | Volume of porewater/volume of solids (without volume of evaporated salt). |
void_ratio | Void ratio (MAD) | — | Volume of porewater/volume of solids (without volume of evaporated salt). |
method | MAD submethod | — | Submethod used to calculate MAD results: A, B, C, D. |
mass_wet | Wet mass | g | Measured or calculated mass of the bulk sample (including mass of porewater, material, and dissolved salt). |
mass_dry | Dry mass | g | Measured or calculated mass of the dried sample (including mass of evaporated salt). |
volume_wet | Wet volume | cm^3 | Measured or calculated volume of the bulk sample (including volume of porewater, material, and dissolved salt). |
volume_dry | Dry volume | cm^3 | Measured or calculated volume of dried sample (including evaporated salt). |
mass_porewater | Mass of porewater | g | Mass of the porewater in the sample. |
volume_porewater | Volume of porewater | mL | Volume of porewater in the bulk (raw) sample. |
mass_salt | Mass of salt | g | Mass of evaporated salt in the sample. |
volume_salt | Volume of salt | cm^3 | Volume of dissolved salt in the bulk sample. |
mass_solids | Mass of solids | g | Mass of the solid material in the sample (without mass of evaporated salt). |
volume_solids | Volume of solids | cm^3 | Volume of solid material in the sample (without volume of dissolved salt). |
C. Retrieve Data from LIMS
Expedition data can be downloaded from the database using the instrument Expanded Report on Download LIMS core data (LORE).
IV. Important Notes
MAD Computations
MAD computations are performed when triggered by the user as described above in "MAD Calculations." Each time computation is triggered, the program will recalculate the results and update the database. (This may be necessary, for example, if the wet and dry mass measurements were switched.) The computations are performed for each completed submethod using the following formulas.
Formula or Condition | Action | LIMS | Formula with LIMS Components |
Constants Used in Computations | |||
get | MAD | density_water = 1 (g/cm3) | |
get | MAD | density_porewater = 1.024 (g/cm3) | |
get | MAD | density_salt = 2.22 (g/cm3) | |
get | MAD | salinity = 35 | |
get | MAD | mass_ratio = 0.965 | |
get | MAD | volume_ratio = 0.988 | |
Get Container Information: Submethods A, B, C, D | |||
get | CONTAINER | container_number | |
get | CONTAINER | material_type | |
get | CONTAINER | mass | |
get | CONTAINER | density | |
get | CONTAINER | volume | |
Geometric Volume: Submethods A, D | |||
select | CALIPER | container_number | |
set | CALIPER | geometry = [cylinder; rectangular prism] | |
measure | CALIPER | length | |
measure | CALIPER | width | |
measure | CALIPER | height | |
measure | CALIPER | diameter | |
geometry = “rectangular prism” | calculate | CALIPER | volume = length * width * height |
geometry = “cylinder” | calculate | CALIPER | volume = [diameter/2]^2 * pi * dimension_c_height |
Wet Mass: Submethods A, B, C | |||
select | MAD-MASS | container_number | |
measure | MAD-MASS | mass_wet_container | |
calculate | MAD-MASS | mass_wet = mass_wet_container – mass{CONTAINER} | |
Dry Mass: Submethods A, B, C, D | |||
select | MAD-MASS | container_number | |
measure | MAD-MASS | mass_dry_container | |
calculate | MAD-MASS | mass_dry = mass_dry_container – mass{CONTAINER} | |
Formula or Condition | Action | LIMS | Formula with LIMS Components |
Pycnometry Wet Volume: Submethod B | |||
select | PYC | container_number | |
select | PYC | cell_number | |
measure | PYC | volume_wet_container | |
calculate | PYC | volume_wet = volume_wet_container – volume{CONTAINER} | |
count | PYC | number_measurements | |
calculate | PYC | pyc_stdev | |
measure | PYC | temperature | |
enter | PYC | comment | |
Pycnometry Dry Volume: Submethods C and D | |||
select | PYC | container_number | |
select | PYC | cell_number | |
measure | PYC | volume_dry_container | |
calculate | PYC | volume_dry = volume_dry_container – volume{CONTAINER} | |
count | PYC | number_measurements | |
calculate | PYC | pyc_stdev | |
measure | PYC | temperature | |
enter | PYC | comment | |
Intermediary Computations: Submethod A | |||
set | MAD | method = “A” | |
get | MAD | volume_wet = volume{CALIPER} | |
get | MAD | mass_wet = mass_wet{MAD_MASS} | |
get | MAD | mass_dry = mass_dry{MAD_MASS} | |
Mpw = (Mt – Md)/rm | calculate | MAD | mass_porewater = [mass_wet – mass_dry]/mass_ratio |
Vpw = Mpw/Dpw | calculate | MAD | volume_porewater = mass_porewater/density_porewater |
Ms = Mt – Mpw | calculate | MAD | mass_solids = mass_wet – mass_porewater |
Vs = Vt – Vpw | calculate | MAD | volume_solids = volume_wet – volume_porewater |
Intermediary Computations: Submethod B | |||
set | MAD | method = “B” | |
get | MAD | mass_wet = mass_wet{MAD_MASS} | |
get | MAD | mass_dry = mass_dry{MAD_MASS} | |
get | MAD | volume_wet = volume_wet{PYC} | |
Mpw = (Mt – Md)/rm | calculate | MAD | mass_porewater = [mass_wet – mass_dry]/mass_ratio |
Vpw = Mpw/Dpw | calculate | MAD | volume_porewater = mass_porewater/density_porewater |
Ms = Mt – Mpw | calculate | MAD | mass_solids = mass_wet – mass_porewater |
Vs = Vt – Vpw | calculate | MAD | volume_solids = volume_wet – volume_porewater |
Formula or Condition | Action | LIMS | Formula with LIMS Components |
Intermediary Computations: Submethod C | |||
set | MAD | method = “C” | |
get | MAD | mass_wet = mass_wet{MAD_MASS} | |
get | MAD | mass_dry = mass_dry{MAD_MASS} | |
get | MAD | volume_dry = volume_dry{PYC} | |
Mpw = (Mt – Md)/rm | calculate | MAD | mass_porewater = [mass_wet – mass_dry]/mass_ratio |
Vpw = Mpw/Dpw | calculate | MAD | volume_porewater = mass_porewater/density_porewater |
Ms = Mt – Mpw | calculate | MAD | mass_solids = mass_wet – mass_porewater |
Msalt = Mpw – (Mt – Md) | calculate | MAD | mass_salt = mass_porewater – [mass_wet – mass_dry] |
Vsalt = Msalt/Dsalt | calculate | MAD | volume_salt = mass_salt/density_salt |
Vt = Vd – Vsalt + Vpw | calculate | MAD | volume_wet = volume_dry – volume_salt + volume_porewater |
Vs = Vt – Vpw | calculate | MAD | volume_solids = volume_wet – volume_porewater |
Intermediary Computations: Sub-Method D | |||
set | MAD | method = “D” | |
get | MAD | volume_wet = volume{CALIPER} | |
get | MAD | mass_dry = mass_dry{MAD_MASS} | |
get | MAD | volume_dry = volume_dry{PYC} | |
Mt = Md + Mw = Md + (Vt – Vd) * 1 | calculate | MAD | mass_wet = mass_dry + [volume_wet – volume_dry] * density_water |
Vpw = Vw/r = (Vt – Vd)/rv | calculate | MAD | volume_porewater = [volume_wet – volume_dry]/volume_ratio |
Mpw = Vpw * Dpw | calculate | MAD | mass_porewater = [mass_wet – mass_dry]/[1 – salinity/1000] |
Ms = Mt(calc) – Mpw | calculate | MAD | mass_solids = mass_wet – mass_porewater |
Vs = Vt – Vpw | calculate | MAD | volume_solids = volume_wet – volume_porewater |
Final Computations: Submethods A, B, C, D | |||
WW = Mpw/Mt | calculate | MAD | moisture_rel_dry = mass_porewater/mass_wet |
WD = Mpw/Ms | calculate | MAD | moisture_rel_wet = mass_porewater/mass_solids |
BD = Mt/Vt | calculate | MAD | density_bulk = mass_wet/volume_wet |
DD = Ms/Vt | calculate | MAD | density_dry = mass_solids/volume_wet |
GD = Ms/Vs | calculate | MAD | density_grain = mass_solids/volume_solids |
PO = Vpw/Vt | calculate | MAD | porosity = volume_porewater/volume_wet |
VR = Vpw/Vs | calculate | MAD | void_ratio = volume_porewater/volume_solids |
V. Appendix
A.1 Health, Safety & Environment
Health
None of the materials used in the MAD process represent a significant risk to health.
Safety
Pressurized Helium Gas
Helium is a colorless, odorless, tasteless, non-toxic, inert monatomic chemical element that exists only as a gas except in extreme conditions. Neutral helium at standard conditions is non-toxic, plays no biological role and is found in trace amounts in human blood.
Pressurized cylinders represent a physical hazard and should be properly restrained at all times. When being transported, a cylinder must have its cap screwed on tightly.
The delivery pressure for the pycnometer is fairly low and does not present a significant hazard.
Electrical Hazard
The balances, oven, and pycnometer are all electrical devices and care should be taken not to spill liquids on or near them. No high-voltage components are accessible by the general user.
Hot Oven and Samples
The Thermo oven is set to 105°C and can burn the user if care is not taken. Likewise, the samples are very hot when first removed from the oven. Use proper protective equipment (insulated mittens).
Glass Containers
The Wheaton vials are borosilicate glass and somewhat resistant to breakage. If a vial breaks, the broken glass should be gathered up immediately and placed in a sharps container. Please see a technician or the ALO if this occurs for proper disposal instructions. Do NOT place sharp trash in the regular trash bins!
Environment
The MAD method does not generate any hazardous waste.
Remaining samples are used for further analyses after oven-drying and volume determination.
A.2 Maintenance and Troubleshooting
Maintenance
1. If system components are turned on after a period of non-use, allow the system to warm up for at least 30 min before analyses are performed.
2. Keep the cap on the cell chamber except when actually inserting or removing a sample. If the chamber remains uncapped, temperature instability will occur, which could affect analysis results.
Greasing Chamber O-Ring
Use the greasing disk included in the accessory kit to grease the O-ring. Wear rubber gloves to prevent contaminating the grease with oil from your fingertips. Either too much or too little grease can cause problems. Too much grease may alter cell volume and too little grease may result in an imperfect seal and result in leaks.
Remove the chamber cap.
Using a fingertip, apply a thin layer of Dow Corning high vacuum grease to the greasing disk.
Insert the greasing disk into the chamber cap and turn slightly to apply a very light coating of grease to the O-ring.
Replacing the Chamber Cap O-Ring (PN: 004/25577/00)
Fine fibers and particles between the O-ring and its sealing surface can cause leaks, as can scratches or cuts in the O-ring or in the metal surfaces. To replace the O-ring:
Pry the O-ring from its groove by pushing a sharp tool into the ring. Be very careful not to scratch the metal surface.
Clean the groove in the chamber cap using a small brush or lint-free cloth and isopropyl alcohol.
Allow the chamber cap to dry.
Grease the O-ring with high vacuum grease.
Replace the O-ring.
Daily Maintenance
1. Keep the cell chamber and cap clean at all times. Particles on the cap seating surface, in the sample cup, under the sample, or clinging to the sample chamber wall may cause inaccurate results.
2. Inspect the cell and cap before each use, and use a lint-free cloth to remove any dust or particles.
Troubleshooting
Measurement problems generally manifest as either slow drift or random fluctuations of reported values.
Thermal Effects
A relatively massive analysis block (sample chamber + expansion chamber) with high thermal conductivity is one of the patented features of the gas pycnometer. Thermal equality between the sample, gas, and analysis block is achieved quickly with an extremely small change in system temperature. This is an important feature for stability because a gas pycnometer must sense pressures and must rely on constant and equal temperature.
A common example of thermal disruption is encountered when a hot sample is placed directly from an oven into the sample chamber. If the sample is not in thermal equilibrium with the sample chamber, then the output of the instrument will drift due to the expansion and associated pressure change of the gas.
Sample Outgassing during Analysis and the Effects of Vapor Pressure
A sample that contains volatile components outgases in the sample chamber of a gas pycnometer. The result is a varying pressure measurement reported as a varying volume or density over several sequential analyses.
It is often assumed that a volatile component such as water vapor contributes a significant volume and that its vapor pressure is insignificant. In fact, the opposite is true. The volume contributed by the presence of water is usually insignificant compared to sample volume but its vapor pressure is significant. The actual effect for a less-than-dry sample is increasing indicated sample volume and decreasing density as water is driven off.
As a general rule, liquids with vapor pressure equal to or less than that of water at room temperature can be measured with a loss of precision proportional to the excess pressure contributed by the liquid. The instrument specifications apply only to samples exhibiting essentially zero vapor pressure.
Leaks
If debris collects on the sealing surface of the cell lid, a leak is likely to ensue. Examine the lid each time it is installed. If the lid surface appears dirty, wipe it clean with a clean dry cloth.
Permeable Samples
Permeability effects are most commonly encountered with samples containing closed cells. Similar effects may be observed when using helium to analyze organic samples or some microporous carbons. Helium can permeate thin walls and even enter into the structure of some materials. The recourse may be to use another gas, perhaps nitrogen; however, this is not recommended for most IODP samples.
Improper Sample Quantity
The most common mistake is to use too little sample material. The sample and expansion chamber volumes are sized such that the maximum accuracy is achieved when the chamber volume is nearly filled with a sample.
If only a limited amount of sample is available, it is better to include a calibrating sphere with the sample and then manually subtract the sphere volume.
Other Common Issues
What Happened | Why | What to Do |
Specified pressure not maintained | Chamber cap not closed | Turn cap clockwise to close |
Chamber cap contaminated with dust or debris | Clean chamber cap and rim of chamber cell with lint-free tissue | |
O-ring not properly greased | Lightly grease O-ring (see Greasing Chamber O-Ring) | |
O-ring not properly seated | Check O-ring for scratches or cuts | |
O-ring is scratched or cut | Replace O-ring (see Replacing the Chamber Cap O-Ring (PN: 004/25577/00)) | |
Gas leaks in cell chambers | Check for leaks (see Leaks) | |
Helium tank empty | Check tank for minimum 200 psig | |
Cylinder valve closed | Check helium cylinder valve | |
Pressure set incorrectly | Set pressure to 10–21 psig | |
Zero offset of pressure transducer set too low | Open chamber cap to check; run zero offset if needed | |
He drained from tank | Leak in gas line connection | –Pressurize the system then open cylinder valve; if pressure gauge needle jumps, a leak may be indicated –Check all connections for leaks. |
Pycnometer valves open or chamber cap left off | Close valves and attach a new tank of helium | |
Will not equilibrate | Pycnometer valves open or chamber cap left off | Close valves and attach a new tank of helium |
Sample outgassing | Re-dry sample | |
Pycnometer is leaking | Check O-ring and regrease or replace | |
Valve seat leaking | –With cap on, open all valves –With He flowing, actuate expansion valve repeatedly for ~1 min to remove lint –Repeat process for vent valve with inlet and expansion valves open |
A.3 Regeneration of Regular and Indicating Drierite Desiccants
Indicating Drierite, the one that is used in the Physical Properties laboratory, can be regenerated for reuse.
The granules may be spread in layers of one granule deep and heated for 1 hour at 210ºC. After that, placed in the original container and sealed while hot. The color of the Drierite will become less distinct after successive regenerations due to the migration of the indicator into the interior of the granule and sublimation of the indicator.
Temperature is very important. Temperatures in the range of 205 ºC to 232 ºC are required to break the bounds between water and calcium sulfate, and release absorbed moisture. Lower temperatures, regardless of heating time, will not regenerate it. Higher temperatures can alter the crystal structure and render the desiccants permanently inactive.
B.1 LabVIEW structure
Software directory structure for LabVIEW
B.2 LIMS Component Tables
The following tables contain all of the LIMS components for the entire MAD process. It includes the following tables:
- CALIPER
- MAD
- MAD_MASS
- PYC
| ANALYSIS | TABLE | NAME | ABOUT TEXT |
| CALIPER | SAMPLE | Exp | Exp: expedition number |
| CALIPER | SAMPLE | Site | Site: site number |
| CALIPER | SAMPLE | Hole | Hole: hole number |
| CALIPER | SAMPLE | Core | Core: core number |
| CALIPER | SAMPLE | Type | Type: type indicates the coring tool used to recover the core (typical types are F, H, R, X). |
| CALIPER | SAMPLE | Sect | Sect: section number |
| CALIPER | SAMPLE | A/W | A/W: archive (A) or working (W) section half. |
| CALIPER | SAMPLE | text_id | Text_ID: automatically generated database identifier for a sample, also carried on the printed labels. This identifier is guaranteed to be unique across all samples. |
| CALIPER | SAMPLE | sample_number | Sample Number: automatically generated database identifier for a sample. This is the primary key of the SAMPLE table. |
| CALIPER | SAMPLE | label_id | Label identifier: automatically generated, human readable name for a sample that is printed on labels. This name is not guaranteed unique across all samples. |
| CALIPER | SAMPLE | sample_name | Sample name: short name that may be specified for a sample. You can use an advanced filter to narrow your search by this parameter. |
| CALIPER | SAMPLE | x_sample_state | Sample state: Single-character identifier always set to "W" for samples; standards can vary. |
| CALIPER | SAMPLE | x_project | Project: similar in scope to the expedition number, the difference being that the project is the current cruise, whereas expedition could refer to material/results obtained on previous cruises |
| CALIPER | SAMPLE | x_capt_loc | Captured location: "captured location," this field is usually null and is unnecessary because any sample captured on the JR has a sample_number ending in 1, and GCR ending in 2 |
| CALIPER | SAMPLE | location | Location: location that sample was taken; this field is usually null and is unnecessary because any sample captured on the JR has a sample_number ending in 1, and GCR ending in 2 |
| CALIPER | SAMPLE | x_sampling_tool | Sampling tool: sampling tool used to take the sample (e.g., syringe, spatula) |
| CALIPER | SAMPLE | changed_by | Changed by: username of account used to make a change to a sample record |
| CALIPER | SAMPLE | changed_on | Changed on: date/time stamp for change made to a sample record |
| CALIPER | SAMPLE | sample_type | Sample type: type of sample from a predefined list (e.g., HOLE, CORE, LIQ) |
| CALIPER | SAMPLE | x_offset | Offset (m): top offset of sample from top of parent sample, expressed in meters. |
| CALIPER | SAMPLE | x_offset_cm | Offset (cm): top offset of sample from top of parent sample, expressed in centimeters. This is a calculated field (offset, converted to cm) |
| CALIPER | SAMPLE | x_bottom_offset_cm | Bottom offset (cm): bottom offset of sample from top of parent sample, expressed in centimeters. This is a calculated field (offset + length, converted to cm) |
| CALIPER | SAMPLE | x_diameter | Diameter (cm): diameter of sample, usually applied only to CORE, SECT, SHLF, and WRND samples; however this field is null on both Exp. 390 and 393, so it is no longer populated by Sample Master |
| CALIPER | SAMPLE | description | SAMPLE comment: contents of the SAMPLE.description field, usually shown on reports as "Sample comments" |
| CALIPER | SAMPLE | x_orig_len | Original length (m): field for the original length of a sample; not always (or reliably) populated |
| CALIPER | SAMPLE | x_length | Length (m): field for the length of a sample [as entered upon creation] |
| CALIPER | SAMPLE | x_length_cm | Length (cm): field for the length of a sample. This is a calculated field (length, converted to cm). |
| CALIPER | SAMPLE | status | Status: single-character code for the current status of a sample (e.g., active, canceled) |
| CALIPER | SAMPLE | old_status | Old status: single-character code for the previous status of a sample; used by the LIME program to restore a canceled sample |
| CALIPER | SAMPLE | original_sample | Original sample: field tying a sample below the CORE level to its parent HOLE sample |
| CALIPER | SAMPLE | parent_sample | Parent sample: the sample from which this sample was taken (e.g., for PWDR samples, this might be a SHLF or possibly another PWDR) |
| CALIPER | SAMPLE | standard | Standard: T/F field to differentiate between samples (standard=F) and QAQC standards (standard=T) |
| CALIPER | SAMPLE | login_by | Login by: username of account used to create the sample (can be the LIMS itself [e.g., SHLFs created when a SECT is created]) |
| CALIPER | SAMPLE | login_date | Login date: creation date of the sample |
| CALIPER | SAMPLE | legacy | Legacy flag: T/F indicator for when a sample is from a previous expedition and is locked/uneditable on this expedition |
| CALIPER | TEST | test changed_on | TEST changed on: date/time stamp for a change to a test record. |
| CALIPER | TEST | test status | TEST status: single-character code for the current status of a test (e.g., active, in process, canceled) |
| CALIPER | TEST | test old_status | TEST old status: single-character code for the previous status of a test; used by the LIME program to restore a canceled test |
| CALIPER | TEST | test test_number | TEST test number: automatically generated database identifier for a test record. This is the primary key of the TEST table. |
| CALIPER | TEST | test date_received | TEST date received: date/time stamp for the creation of the test record. |
| CALIPER | TEST | test instrument | TEST instrument [instrument group]: field that describes the instrument group (most often this applies to loggers with multiple sensors); often obscure (e.g., user_input) |
| CALIPER | TEST | test analysis | TEST analysis: analysis code associated with this test (foreign key to the ANALYSIS table) |
| CALIPER | TEST | test x_project | TEST project: similar in scope to the expedition number, the difference being that the project is the current cruise, whereas expedition could refer to material/results obtained on previous cruises |
| CALIPER | TEST | test sample_number | TEST sample number: the sample_number of the sample to which this test record is attached; a foreign key to the SAMPLE table |
| CALIPER | CALCULATED | Top depth CSF-A (m) | Top depth CSF-A (m): position of observation expressed relative to the top of the hole. |
| CALIPER | CALCULATED | Bottom depth CSF-A (m) | Bottom depth CSF-A (m): position of observation expressed relative to the top of the hole. |
| CALIPER | CALCULATED | Top depth CSF-B (m) | Top depth [other] (m): position of observation expressed relative to the top of the hole. The location is presented in a scale selected by the science party or the report user. |
| CALIPER | CALCULATED | Bottom depth CSF-B (m) | Bottom depth [other] (m): position of observation expressed relative to the top of the hole. The location is presented in a scale selected by the science party or the report user. |
| CALIPER | RESULT | comment | RESULT comment: contents of a result parameter with name = "comment," usually shown on reports as "Result comments" |
| CALIPER | RESULT | container_number | RESULT container number: number of the container containing the sample measured in this test. (Effectively, this is a secondary foreign key to the SAMPLE table.) |
| CALIPER | RESULT | diameter (cm) | RESULT diameter (cm): the diameter of a cut sample cylinder used for the volume calculation |
| CALIPER | RESULT | geometry | RESULT geometry: the geometry of the cut sample (usually rectangular prism, cube, or cylinder) |
| CALIPER | RESULT | height (cm) | RESULT height (cm): the height of a sample (either cylinder, cube, or rectangular prism) used for the volume calculation |
| CALIPER | RESULT | length (cm) | RESULT length (cm): the length of a sample (either cube or rectangular prism) used for the volume calculation |
| CALIPER | RESULT | volume (cm³) | RESULT volume (cm^3): the volume of the sample as determined by the geometric type and the individual measurements (volume = height x length x width, or height x (diameter/2)^2 x pi) |
| CALIPER | RESULT | width (cm) | RESULT width (cm): the width of a sample (either cube or rectangular prism) used for the volume calculation |
| ANALYSIS | TABLE | NAME | ABOUT TEXT |
| MAD | SAMPLE | Exp | Exp: expedition number |
| MAD | SAMPLE | Site | Site: site number |
| MAD | SAMPLE | Hole | Hole: hole number |
| MAD | SAMPLE | Core | Core: core number |
| MAD | SAMPLE | Type | Type: type indicates the coring tool used to recover the core (typical types are F, H, R, X). |
| MAD | SAMPLE | Sect | Sect: section number |
| MAD | SAMPLE | A/W | A/W: archive (A) or working (W) section half. |
| MAD | SAMPLE | text_id | Text_ID: automatically generated database identifier for a sample, also carried on the printed labels. This identifier is guaranteed to be unique across all samples. |
| MAD | SAMPLE | sample_number | Sample Number: automatically generated database identifier for a sample. This is the primary key of the SAMPLE table. |
| MAD | SAMPLE | label_id | Label identifier: automatically generated, human readable name for a sample that is printed on labels. This name is not guaranteed unique across all samples. |
| MAD | SAMPLE | sample_name | Sample name: short name that may be specified for a sample. You can use an advanced filter to narrow your search by this parameter. |
| MAD | SAMPLE | x_sample_state | Sample state: Single-character identifier always set to "W" for samples; standards can vary. |
| MAD | SAMPLE | x_project | Project: similar in scope to the expedition number, the difference being that the project is the current cruise, whereas expedition could refer to material/results obtained on previous cruises |
| MAD | SAMPLE | x_capt_loc | Captured location: "captured location," this field is usually null and is unnecessary because any sample captured on the JR has a sample_number ending in 1, and GCR ending in 2 |
| MAD | SAMPLE | location | Location: location that sample was taken; this field is usually null and is unnecessary because any sample captured on the JR has a sample_number ending in 1, and GCR ending in 2 |
| MAD | SAMPLE | x_sampling_tool | Sampling tool: sampling tool used to take the sample (e.g., syringe, spatula) |
| MAD | SAMPLE | changed_by | Changed by: username of account used to make a change to a sample record |
| MAD | SAMPLE | changed_on | Changed on: date/time stamp for change made to a sample record |
| MAD | SAMPLE | sample_type | Sample type: type of sample from a predefined list (e.g., HOLE, CORE, LIQ) |
| MAD | SAMPLE | x_offset | Offset (m): top offset of sample from top of parent sample, expressed in meters. |
| MAD | SAMPLE | x_offset_cm | Offset (cm): top offset of sample from top of parent sample, expressed in centimeters. This is a calculated field (offset, converted to cm) |
| MAD | SAMPLE | x_bottom_offset_cm | Bottom offset (cm): bottom offset of sample from top of parent sample, expressed in centimeters. This is a calculated field (offset + length, converted to cm) |
| MAD | SAMPLE | x_diameter | Diameter (cm): diameter of sample, usually applied only to CORE, SECT, SHLF, and WRND samples; however this field is null on both Exp. 390 and 393, so it is no longer populated by Sample Master |
| MAD | SAMPLE | x_idmp | |
| MAD | SAMPLE | x_orig_len | Original length (m): field for the original length of a sample; not always (or reliably) populated |
| MAD | SAMPLE | x_length | Length (m): field for the length of a sample [as entered upon creation] |
| MAD | SAMPLE | x_length_cm | Length (cm): field for the length of a sample. This is a calculated field (length, converted to cm). |
| MAD | SAMPLE | status | Status: single-character code for the current status of a sample (e.g., active, canceled) |
| MAD | SAMPLE | old_status | Old status: single-character code for the previous status of a sample; used by the LIME program to restore a canceled sample |
| MAD | SAMPLE | original_sample | Original sample: field tying a sample below the CORE level to its parent HOLE sample |
| MAD | SAMPLE | parent_sample | Parent sample: the sample from which this sample was taken (e.g., for PWDR samples, this might be a SHLF or possibly another PWDR) |
| MAD | SAMPLE | standard | Standard: T/F field to differentiate between samples (standard=F) and QAQC standards (standard=T) |
| MAD | SAMPLE | login_by | Login by: username of account used to create the sample (can be the LIMS itself [e.g., SHLFs created when a SECT is created]) |
| MAD | SAMPLE | login_date | Login date: creation date of the sample |
| MAD | SAMPLE | legacy | Legacy flag: T/F indicator for when a sample is from a previous expedition and is locked/uneditable on this expedition |
| MAD | TEST | test changed_on | TEST changed on: date/time stamp for a change to a test record. |
| MAD | TEST | test date_started | |
| MAD | TEST | test group_name | |
| MAD | TEST | test status | TEST status: single-character code for the current status of a test (e.g., active, in process, canceled) |
| MAD | TEST | test old_status | TEST old status: single-character code for the previous status of a test; used by the LIME program to restore a canceled test |
| MAD | TEST | test test_number | TEST test number: automatically generated database identifier for a test record. This is the primary key of the TEST table. |
| MAD | TEST | test date_received | TEST date received: date/time stamp for the creation of the test record. |
| MAD | TEST | test instrument | TEST instrument [instrument group]: field that describes the instrument group (most often this applies to loggers with multiple sensors); often obscure (e.g., user_input) |
| MAD | TEST | test analysis | TEST analysis: analysis code associated with this test (foreign key to the ANALYSIS table) |
| MAD | TEST | test x_project | TEST project: similar in scope to the expedition number, the difference being that the project is the current cruise, whereas expedition could refer to material/results obtained on previous cruises |
| MAD | TEST | test version | |
| MAD | TEST | test order_number | |
| MAD | TEST | test replicate_test | |
| MAD | TEST | test replicate_count | |
| MAD | TEST | test sample_number | TEST sample number: the sample_number of the sample to which this test record is attached; a foreign key to the SAMPLE table |
| MAD | CALCULATED | Top depth CSF-A (m) | Top depth CSF-A (m): position of observation expressed relative to the top of the hole. |
| MAD | CALCULATED | Bottom depth CSF-A (m) | Bottom depth CSF-A (m): position of observation expressed relative to the top of the hole. |
| MAD | CALCULATED | Top depth CSF-B (m) | Top depth [other] (m): position of observation expressed relative to the top of the hole. The location is presented in a scale selected by the science party or the report user. |
| MAD | CALCULATED | Bottom depth CSF-B (m) | Bottom depth [other] (m): position of observation expressed relative to the top of the hole. The location is presented in a scale selected by the science party or the report user. |
| MAD | RESULT | container_number | RESULT container_number: the container number for the sample being analyzed; numbers 1-50 are re-usable anodized aluminum containers for use with hard rocks |
| MAD | RESULT | density_bulk (g/cm³) | RESULT bulk density (g/cm^3): grams of mass per cubic centimeter of volume of the bulk sample. |
| MAD | RESULT | density_dry (g/cm³) | RESULT dry density (g/cm^3): grams of mass of solids, including mass of evaporated salt, per cubic centimeter of bulk sample. |
| MAD | RESULT | density_grain (g/cm³) | RESULT grain density (g/cm^3): grams of mass of solids without the mass of evaporated salt per cubic centimeter of solids, excluding the volume of evaporated salt. |
| MAD | RESULT | mass_dry (g) | RESULT mass dry sample (g): calculated mass of dried sample, including evaporated salt. Container (if any) is excluded. |
| MAD | RESULT | mass_porewater (g) | RESULT mass porewater (g): calculated mass of the pore water in the sample. |
| MAD | RESULT | mass_salt (g) | RESULT mass salt (g): calculated mass of the evaporated salt in the sample. |
| MAD | RESULT | mass_solids (g) | RESULT mass solids (g): calculated mass of the solid material excluding the evaporated salt in the sample. |
| MAD | RESULT | mass_wet (g) | RESULT mass wet sample (g): calculated mass of the bulk sample, including the mass of the pore water, solid material, and dissolved salt. Container (if any) is excluded. |
| MAD | RESULT | method | RESULT submethod: method used to calculate the information in this test (A, B, C, or D). |
| MAD | RESULT | moisture_rel_dry (wt%) | RESULT moisture dry (wt%): relative moisture content of the sample expressed in percentage on a weight of water/weight of dry sample (without evaporated salt) basis. |
| MAD | RESULT | moisture_rel_wet (wt%) | RESULT moisture wet (wt%): relative moisture content of the sample, expressed in percentage on a weight of water/weight of bulk sample (including moisture and dissolved salt) basis. |
| MAD | RESULT | porosity (vol%) | RESULT porosity (vol%): volume of pore water per volume of bulk sample expressed in percent. |
| MAD | RESULT | void_ratio | RESULT void ratio (unitless): ratio of the volume of pore water per volume of solids, without the volume of the evaporated salt. |
| MAD | RESULT | volume_dry (cm³) | RESULT volume dry (cm^3): calculated volume of the dried sample, which includes solid material and dried salt. Container (if any) is excluded. |
| MAD | RESULT | volume_porewater (cm³) | RESULT volume porewater (cm^3): calculated volume of pore water in the bulk sample. |
| MAD | RESULT | volume_salt (cm³) | RESULT volume salt (cm^3): calculated volume of dissolved salt in the bulk sample. |
| MAD | RESULT | volume_solids (cm³) | RESULT volume solids (cm^3): calculated volume of the solid material, excluding dried salt. |
| MAD | RESULT | volume_wet (cm³) | RESULT volume wet (cm^3): calculated volume of the bulk sample, including the volume of the pore water, solid material, and dissolved salt. Container (if any) is excluded. |
| MAD | SAMPLE | sample description | SAMPLE comment: contents of the SAMPLE.description field, usually shown on reports as "Sample comments" |
| ANALYSIS | TABLE | NAME | ABOUT TEXT |
| MAD_MASS | SAMPLE | Exp | Exp: expedition number |
| MAD_MASS | SAMPLE | Site | Site: site number |
| MAD_MASS | SAMPLE | Hole | Hole: hole number |
| MAD_MASS | SAMPLE | Core | Core: core number |
| MAD_MASS | SAMPLE | Type | Type: type indicates the coring tool used to recover the core (typical types are F, H, R, X). |
| MAD_MASS | SAMPLE | Sect | Sect: section number |
| MAD_MASS | SAMPLE | A/W | A/W: archive (A) or working (W) section half. |
| MAD_MASS | SAMPLE | text_id | Text_ID: automatically generated database identifier for a sample, also carried on the printed labels. This identifier is guaranteed to be unique across all samples. |
| MAD_MASS | SAMPLE | sample_number | Sample Number: automatically generated database identifier for a sample. This is the primary key of the SAMPLE table. |
| MAD_MASS | SAMPLE | label_id | Label identifier: automatically generated, human readable name for a sample that is printed on labels. This name is not guaranteed unique across all samples. |
| MAD_MASS | SAMPLE | sample_name | Sample name: short name that may be specified for a sample. You can use an advanced filter to narrow your search by this parameter. |
| MAD_MASS | SAMPLE | x_sample_state | Sample state: Single-character identifier always set to "W" for samples; standards can vary. |
| MAD_MASS | SAMPLE | x_project | Project: similar in scope to the expedition number, the difference being that the project is the current cruise, whereas expedition could refer to material/results obtained on previous cruises |
| MAD_MASS | SAMPLE | x_capt_loc | Captured location: "captured location," this field is usually null and is unnecessary because any sample captured on the JR has a sample_number ending in 1, and GCR ending in 2 |
| MAD_MASS | SAMPLE | location | Location: location that sample was taken; this field is usually null and is unnecessary because any sample captured on the JR has a sample_number ending in 1, and GCR ending in 2 |
| MAD_MASS | SAMPLE | x_sampling_tool | Sampling tool: sampling tool used to take the sample (e.g., syringe, spatula) |
| MAD_MASS | SAMPLE | changed_by | Changed by: username of account used to make a change to a sample record |
| MAD_MASS | SAMPLE | changed_on | Changed on: date/time stamp for change made to a sample record |
| MAD_MASS | SAMPLE | sample_type | Sample type: type of sample from a predefined list (e.g., HOLE, CORE, LIQ) |
| MAD_MASS | SAMPLE | x_offset | Offset (m): top offset of sample from top of parent sample, expressed in meters. |
| MAD_MASS | SAMPLE | x_offset_cm | Offset (cm): top offset of sample from top of parent sample, expressed in centimeters. This is a calculated field (offset, converted to cm) |
| MAD_MASS | SAMPLE | x_bottom_offset_cm | Bottom offset (cm): bottom offset of sample from top of parent sample, expressed in centimeters. This is a calculated field (offset + length, converted to cm) |
| MAD_MASS | SAMPLE | x_diameter | Diameter (cm): diameter of sample, usually applied only to CORE, SECT, SHLF, and WRND samples; however this field is null on both Exp. 390 and 393, so it is no longer populated by Sample Master |
| MAD_MASS | SAMPLE | description | SAMPLE comment: contents of the SAMPLE.description field, usually shown on reports as "Sample comments" |
| MAD_MASS | SAMPLE | x_orig_len | Original length (m): field for the original length of a sample; not always (or reliably) populated |
| MAD_MASS | SAMPLE | x_length | Length (m): field for the length of a sample [as entered upon creation] |
| MAD_MASS | SAMPLE | x_length_cm | Length (cm): field for the length of a sample. This is a calculated field (length, converted to cm). |
| MAD_MASS | SAMPLE | status | Status: single-character code for the current status of a sample (e.g., active, canceled) |
| MAD_MASS | SAMPLE | old_status | Old status: single-character code for the previous status of a sample; used by the LIME program to restore a canceled sample |
| MAD_MASS | SAMPLE | original_sample | Original sample: field tying a sample below the CORE level to its parent HOLE sample |
| MAD_MASS | SAMPLE | parent_sample | Parent sample: the sample from which this sample was taken (e.g., for PWDR samples, this might be a SHLF or possibly another PWDR) |
| MAD_MASS | SAMPLE | standard | Standard: T/F field to differentiate between samples (standard=F) and QAQC standards (standard=T) |
| MAD_MASS | SAMPLE | login_by | Login by: username of account used to create the sample (can be the LIMS itself [e.g., SHLFs created when a SECT is created]) |
| MAD_MASS | SAMPLE | login_date | Login date: creation date of the sample |
| MAD_MASS | SAMPLE | legacy | Legacy flag: T/F indicator for when a sample is from a previous expedition and is locked/uneditable on this expedition |
| MAD_MASS | TEST | test changed_on | TEST changed on: date/time stamp for a change to a test record. |
| MAD_MASS | TEST | test status | TEST status: single-character code for the current status of a test (e.g., active, in process, canceled) |
| MAD_MASS | TEST | test old_status | TEST old status: single-character code for the previous status of a test; used by the LIME program to restore a canceled test |
| MAD_MASS | TEST | test test_number | TEST test number: automatically generated database identifier for a test record. This is the primary key of the TEST table. |
| MAD_MASS | TEST | test date_received | TEST date received: date/time stamp for the creation of the test record. |
| MAD_MASS | TEST | test instrument | TEST instrument [instrument group]: field that describes the instrument group (most often this applies to loggers with multiple sensors); often obscure (e.g., user_input) |
| MAD_MASS | TEST | test analysis | TEST analysis: analysis code associated with this test (foreign key to the ANALYSIS table) |
| MAD_MASS | TEST | test x_project | TEST project: similar in scope to the expedition number, the difference being that the project is the current cruise, whereas expedition could refer to material/results obtained on previous cruises |
| MAD_MASS | TEST | test sample_number | TEST sample number: the sample_number of the sample to which this test record is attached; a foreign key to the SAMPLE table |
| MAD_MASS | CALCULATED | Top depth CSF-A (m) | Top depth CSF-A (m): position of observation expressed relative to the top of the hole. |
| MAD_MASS | CALCULATED | Bottom depth CSF-A (m) | Bottom depth CSF-A (m): position of observation expressed relative to the top of the hole. |
| MAD_MASS | CALCULATED | Top depth CSF-B (m) | Top depth [other] (m): position of observation expressed relative to the top of the hole. The location is presented in a scale selected by the science party or the report user. |
| MAD_MASS | CALCULATED | Bottom depth CSF-B (m) | Bottom depth [other] (m): position of observation expressed relative to the top of the hole. The location is presented in a scale selected by the science party or the report user. |
| MAD_MASS | RESULT | container_number | RESULT container_number: the container number for the sample being analyzed; numbers 1-50 are re-usable anodized aluminum containers for use with hard rocks |
| MAD_MASS | RESULT | mass_dry (g) | RESULT mass dry sample (g): calculated mass of dried sample, including evaporated salt. Container (if any) is excluded. |
| MAD_MASS | RESULT | mass_dry_container (g) | RESULT mass dry sample plus container (g): calculated mass of dried sample, including evaporated salt. Container (if any) is included. |
| MAD_MASS | RESULT | mass_wet (g) | RESULT mass wet sample (g): calculated mass of the bulk sample, including the mass of the pore water, solid material, and dissolved salt. Container (if any) is excluded. |
| MAD_MASS | RESULT | mass_wet_container (g) | RESULT mass wet sample plus container (g): calculated mass of the bulk sample, including the mass of the pore water, solid material, and dissolved salt. Container (if any) is included. |
| MAD_MASS | RESULT | number_measurements_dry | RESULT number of measurements (dry): number of balance measurements for the dry mass determination; these may differ between wet and dry because sea state might have changed. |
| MAD_MASS | RESULT | number_measurements_wet | RESULT number of measurements (wet): number of balance measurements for the wet mass determination; these may differ between wet and dry because sea state might have changed. |
| ANALYSIS | TABLE | NAME | ABOUT TEXT |
| PYC | SAMPLE | Exp | Exp: expedition number |
| PYC | SAMPLE | Site | Site: site number |
| PYC | SAMPLE | Hole | Hole: hole number |
| PYC | SAMPLE | Core | Core: core number |
| PYC | SAMPLE | Type | Type: type indicates the coring tool used to recover the core (typical types are F, H, R, X). |
| PYC | SAMPLE | Sect | Sect: section number |
| PYC | SAMPLE | A/W | A/W: archive (A) or working (W) section half. |
| PYC | SAMPLE | text_id | Text_ID: automatically generated database identifier for a sample, also carried on the printed labels. This identifier is guaranteed to be unique across all samples. |
| PYC | SAMPLE | sample_number | Sample Number: automatically generated database identifier for a sample. This is the primary key of the SAMPLE table. |
| PYC | SAMPLE | label_id | Label identifier: automatically generated, human readable name for a sample that is printed on labels. This name is not guaranteed unique across all samples. |
| PYC | SAMPLE | sample_name | Sample name: short name that may be specified for a sample. You can use an advanced filter to narrow your search by this parameter. |
| PYC | SAMPLE | x_sample_state | Sample state: Single-character identifier always set to "W" for samples; standards can vary. |
| PYC | SAMPLE | x_project | Project: similar in scope to the expedition number, the difference being that the project is the current cruise, whereas expedition could refer to material/results obtained on previous cruises |
| PYC | SAMPLE | x_capt_loc | Captured location: "captured location," this field is usually null and is unnecessary because any sample captured on the JR has a sample_number ending in 1, and GCR ending in 2 |
| PYC | SAMPLE | location | Location: location that sample was taken; this field is usually null and is unnecessary because any sample captured on the JR has a sample_number ending in 1, and GCR ending in 2 |
| PYC | SAMPLE | x_sampling_tool | Sampling tool: sampling tool used to take the sample (e.g., syringe, spatula) |
| PYC | SAMPLE | changed_by | Changed by: username of account used to make a change to a sample record |
| PYC | SAMPLE | changed_on | Changed on: date/time stamp for change made to a sample record |
| PYC | SAMPLE | sample_type | Sample type: type of sample from a predefined list (e.g., HOLE, CORE, LIQ) |
| PYC | SAMPLE | x_offset | Offset (m): top offset of sample from top of parent sample, expressed in meters. |
| PYC | SAMPLE | x_offset_cm | Offset (cm): top offset of sample from top of parent sample, expressed in centimeters. This is a calculated field (offset, converted to cm) |
| PYC | SAMPLE | x_bottom_offset_cm | Bottom offset (cm): bottom offset of sample from top of parent sample, expressed in centimeters. This is a calculated field (offset + length, converted to cm) |
| PYC | SAMPLE | x_diameter | Diameter (cm): diameter of sample, usually applied only to CORE, SECT, SHLF, and WRND samples; however this field is null on both Exp. 390 and 393, so it is no longer populated by Sample Master |
| PYC | SAMPLE | x_orig_len | Original length (m): field for the original length of a sample; not always (or reliably) populated |
| PYC | SAMPLE | x_length | Length (m): field for the length of a sample [as entered upon creation] |
| PYC | SAMPLE | x_length_cm | Length (cm): field for the length of a sample. This is a calculated field (length, converted to cm). |
| PYC | SAMPLE | status | Status: single-character code for the current status of a sample (e.g., active, canceled) |
| PYC | SAMPLE | old_status | Old status: single-character code for the previous status of a sample; used by the LIME program to restore a canceled sample |
| PYC | SAMPLE | original_sample | Original sample: field tying a sample below the CORE level to its parent HOLE sample |
| PYC | SAMPLE | parent_sample | Parent sample: the sample from which this sample was taken (e.g., for PWDR samples, this might be a SHLF or possibly another PWDR) |
| PYC | SAMPLE | standard | Standard: T/F field to differentiate between samples (standard=F) and QAQC standards (standard=T) |
| PYC | SAMPLE | login_by | Login by: username of account used to create the sample (can be the LIMS itself [e.g., SHLFs created when a SECT is created]) |
| PYC | SAMPLE | login_date | Login date: creation date of the sample |
| PYC | SAMPLE | legacy | Legacy flag: T/F indicator for when a sample is from a previous expedition and is locked/uneditable on this expedition |
| PYC | TEST | test changed_on | TEST changed on: date/time stamp for a change to a test record. |
| PYC | TEST | test status | TEST status: single-character code for the current status of a test (e.g., active, in process, canceled) |
| PYC | TEST | test old_status | TEST old status: single-character code for the previous status of a test; used by the LIME program to restore a canceled test |
| PYC | TEST | test test_number | TEST test number: automatically generated database identifier for a test record. This is the primary key of the TEST table. |
| PYC | TEST | test date_received | TEST date received: date/time stamp for the creation of the test record. |
| PYC | TEST | test instrument | TEST instrument [instrument group]: field that describes the instrument group (most often this applies to loggers with multiple sensors); often obscure (e.g., user_input) |
| PYC | TEST | test analysis | TEST analysis: analysis code associated with this test (foreign key to the ANALYSIS table) |
| PYC | TEST | test x_project | TEST project: similar in scope to the expedition number, the difference being that the project is the current cruise, whereas expedition could refer to material/results obtained on previous cruises |
| PYC | TEST | test sample_number | TEST sample number: the sample_number of the sample to which this test record is attached; a foreign key to the SAMPLE table |
| PYC | CALCULATED | Top depth CSF-A (m) | Top depth CSF-A (m): position of observation expressed relative to the top of the hole. |
| PYC | CALCULATED | Bottom depth CSF-A (m) | Bottom depth CSF-A (m): position of observation expressed relative to the top of the hole. |
| PYC | CALCULATED | Top depth CSF-B (m) | Top depth [other] (m): position of observation expressed relative to the top of the hole. The location is presented in a scale selected by the science party or the report user. |
| PYC | CALCULATED | Bottom depth CSF-B (m) | Bottom depth [other] (m): position of observation expressed relative to the top of the hole. The location is presented in a scale selected by the science party or the report user. |
| PYC | RESULT | cell_number | RESULT container_number: the container number for the sample being analyzed; numbers 1-50 are re-usable anodized aluminum containers for use with hard rocks |
| PYC | SAMPLE | comment | SAMPLE comment: contents of the SAMPLE.description field, usually shown on reports as "Sample comments" |
| PYC | RESULT | container_number | RESULT container_number: the container number for the sample being analyzed; numbers 1-50 are re-usable anodized aluminum containers for use with hard rocks |
| PYC | RESULT | number_measurements | RESULT number of measurements: the number of repeat measurements the pycnometer was ordered to perform and average together |
| PYC | RESULT | pyc_stdev (cm³) | RESULT pycnometer volume standard deviation (cm^3): standard deviation of the repeated measurements of the pycnometer |
| PYC | RESULT | temperature (°C) | RESULT temperature (deg. C): temperature of the cell at the time of the measurement |
| PYC | RESULT | volume_dry (cm³) | RESULT sample dry volume (cm^3): calculated volume of the dried sample, which includes solid material and dried salt. Container (if any) is excluded. |
| PYC | RESULT | volume_dry_container (cm³) | RESULT sample plus container dry volume (cm^3): calculated volume of the dried sample, which includes solid material and dried salt. Container (if any) is included. |
| PYC | RESULT | volume_wet (cm³) | RESULT sample wet volume (cm^3): calculated volume of the bulk sample, including the volume of the pore water, solid material, and dissolved salt. Container (if any) is excluded. NOTE this will only be populated if a non-recommended MAD Method is used! |
| PYC | RESULT | volume_wet_container (cm³) | RESULT sample plus container wet volume (cm^3): calculated volume of the wet sample, which includes solid material and dried salt. Container (if any) is included. NOTE this will only be populated if a non-recommended MAD Method is used! |
C.1 Hardware
Hardware Settings
Pressure transducer
Output: 0–5 V DC
Range: 0–25 psig
Orifice: 0.04 in.
Operational coil voltage: 11–13 V DC pulsed 30 ms ± 2 ms
Service pressure: 30 psi differential bidirectional
Valve type: latching solenoid
Solenoids
Solenoid, HHE (each cell requires 1): Micromeritics PN: 133/60804/00
Solenoid, IHE (each cell requires 2): Micromeritics PN: 133/60804/00
Pin 1: brown: closed
Pin 2: black: common
Pin 3: orange: open
Pin 4: key: key
Pins 5 & 6: not used
Apparatus, Reagents, & Materials
Hardware
Dual balance system
Two Mettler-Toledo XS204 analytical balances compensate for ship's motion while weighing samples (see the Balances User Guide for a detailed description of the mass determination system). In Figure 32 note that the left balance is the REFERENCE balance and the right balance is the UNKNOWN balance.
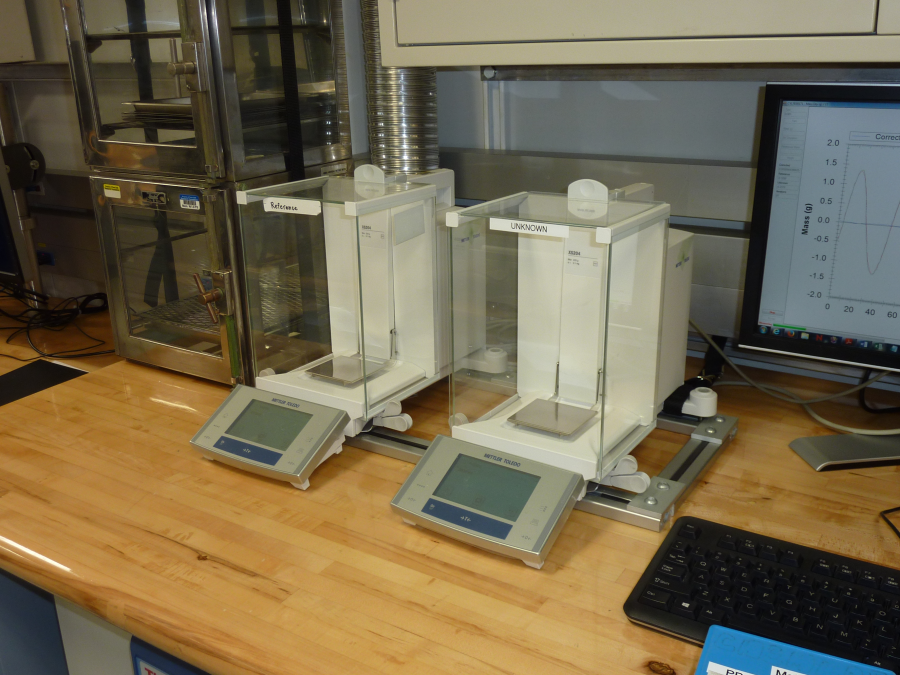
Figure 32. Dual Mettler Toledo XS-204 Analytical Balance System.
Hexapycnometer System
Six custom-configured Micromeretics AccuPyc 1330TC helium-displacement pycnometers can be run simultaneously (Figure 33a). The six cells are mounted in a chassis (Figure 33b) to protect the electronics and to help provide temperature stability. Although the cells are centrally controlled, they can be started and stopped independently.
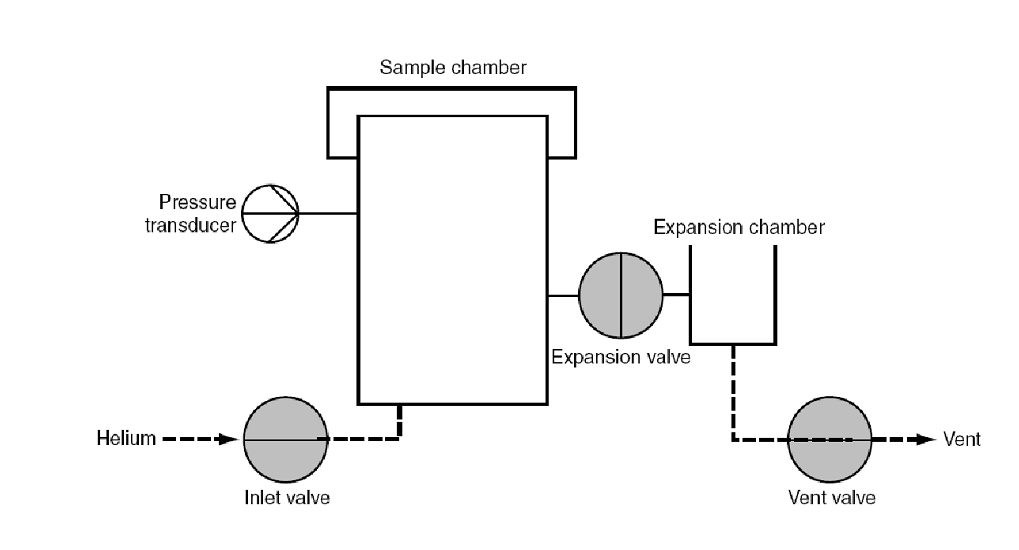
Figure 33a. Schematic of Pycnometer's Chambers, Valves (Solenoids), and Pressure Transducer.
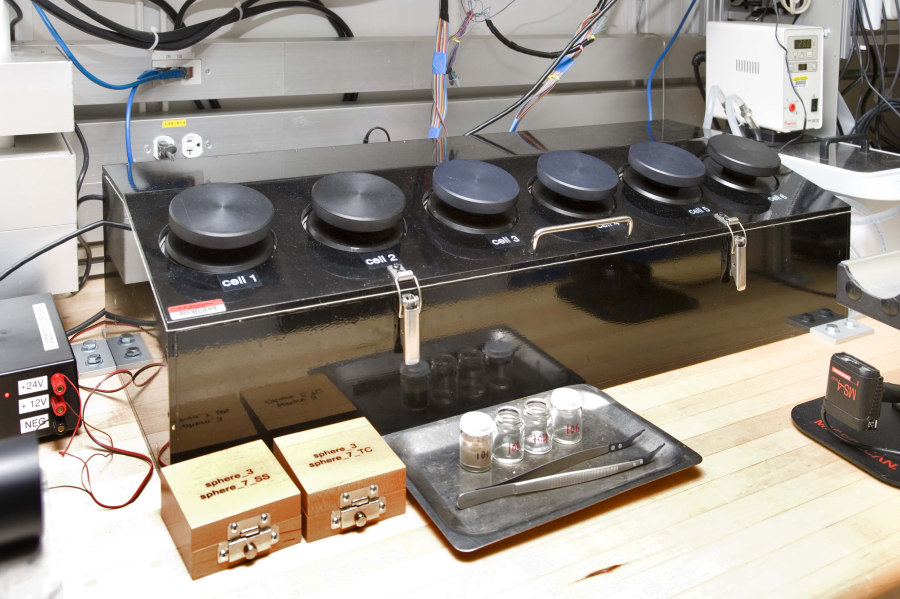
Figure 33b. Helium-Displacement Hexapycnometer.
Helium Supply and Gauge
The system depends on a helium (He) reservoir in TBULK. The regulator at the TBULK gas bottle reservoir is set to 130 psi (Figure 34). Helium is delivered to the core lab through gas supply lines. A regulator and a pressure gauge (Figure 35) at the hexapycnometer are used to deliver low-pressure helium to the instrument. This regulator should be set to 18-20 psi (no higher than 20 psi) to deliver the proper helium pressure to the pycnometer cell gas inlets.
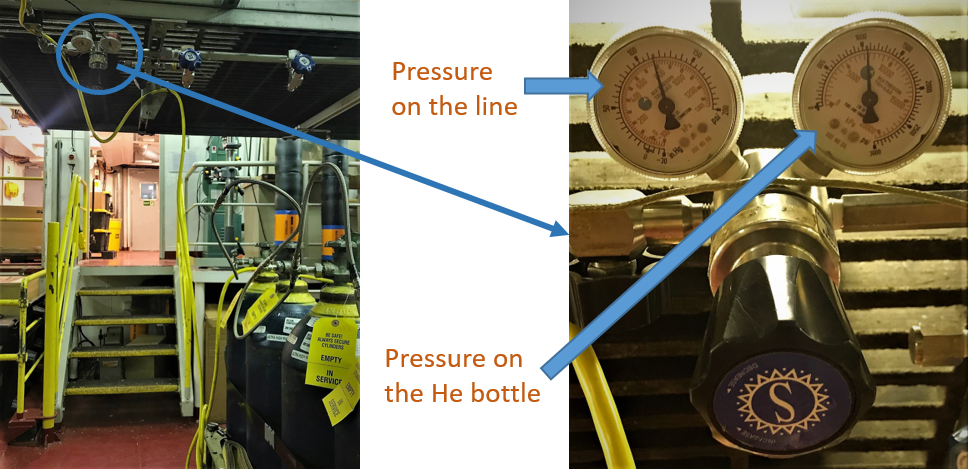
Figure 34. He regulator location in TBULK
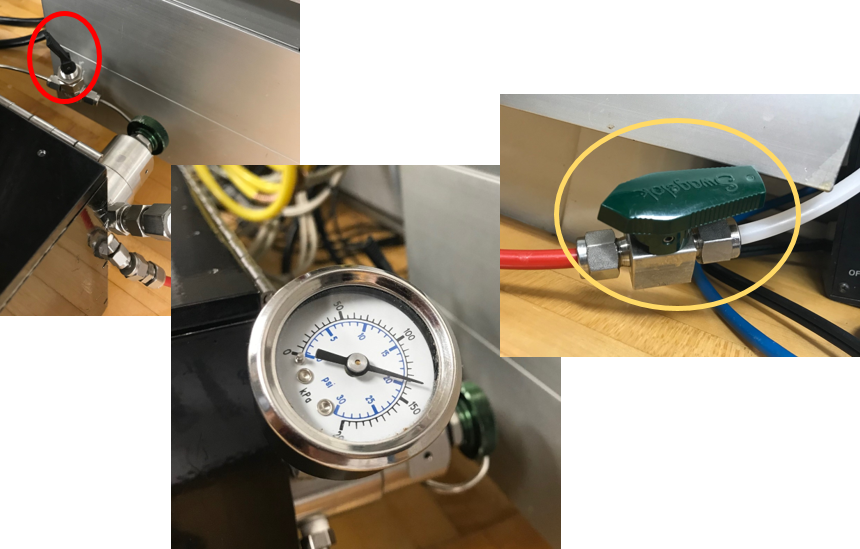
Figure 35. Regulator behind pycnometer (set to 19 psi). Both valves, before and after the regulator, should be open.
If the helium pressure is low at the pycnometer, check that the valve in the ceiling above the sample table is OPEN (Figure 36) (Phys Props Lab). Also check the helium gauges in the Chem Lab (Figure 37). The chem lab helium pressure should be 80 psi. Do not adjust the regulators in the chem lab. Just note the pressure reading.
Figure 36. Ceiling panel with He shut-off valve.
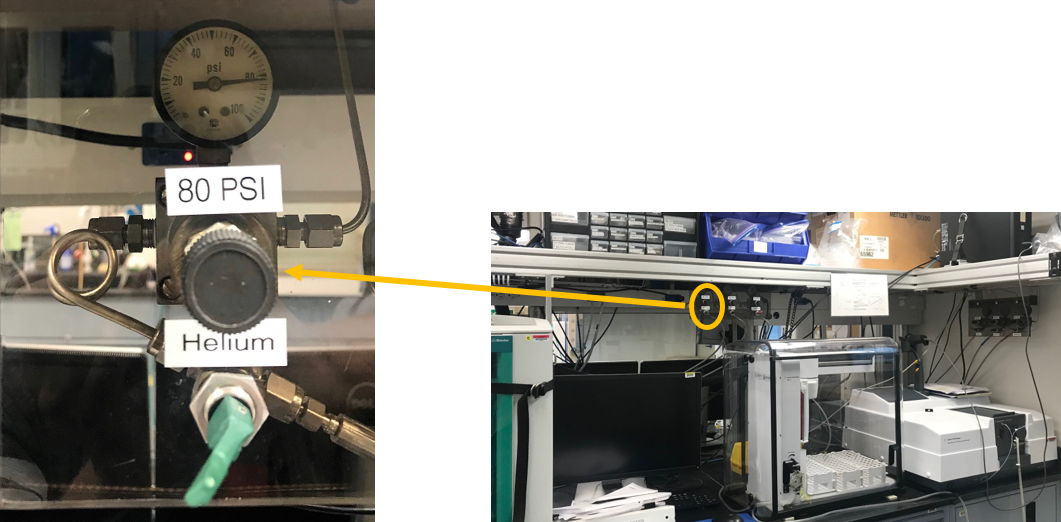
Figure 37. Helium valve in the Chem Lab.
Note: The helium supply to cells is plumbed in parallel, which means that the user will notice fluctuations in pressure in the real-time monitoring windows. Each pycnometer measurement is done in isolation from the helium manifold, so this fluctuation has no effect on the results.
Precision Caliper
The caliper (Figure 38) is used to measure the dimensions of cylinder and rectangular prism-shaped samples. The information is entered in the MADMax software, which calculates the volumes of the solid samples.

Figure 38. Precision Digital Caliper for measuring dimensions of certain samples.
Thermo Scientific HERATHERM AP Oven and Desiccator Boxes
The HERATHERM AP oven (Figure39) used in the moisture determination step is back-vented to the ship’s fume hood system to carry away the moisture liberated from the samples as they dry. The mechanical convection oven has a 60 L capacity and is set to 105°C for the MAD process. The butterfly valve (Figure 40) should be kept vertical to allow oven to vent.
The desiccator boxes hold samples after they have been dried in order to prevent reintroduction of water weight. The Drierite used on the JR is indicating. The color should be blue, indicating that the desiccant is good. If the desiccant is purple it is close to being saturated and once it becomes pink it can be redried in the oven. See dessicant bottle for redrying time and temperature.
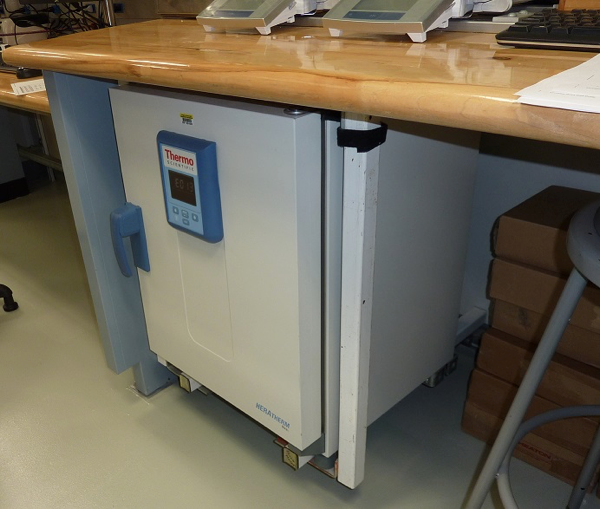
Figure 39. Thermo Scientific HERATHERM AP 60 L oven, mounted underneath the bench. Back-vented, the oven does not warm the benchtop and alter the results from the analytical balances.
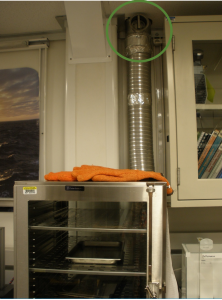
Figure 40. Exhaust tubing and the butterfly valve control (circled in green). The desiccator boxes are to the left of the exhaust tubing.
Electronics and Control System
The software control system is a mixed language tool. MADMax is a C#/.NET application providing sample management, mass measurement, and methods computation. The C#/.NET component integrates with a LabVIEW component to manage volumetric measurement.
Masses are obtained via serial communication (RS232) with dual Mettler Toledo balances. The pycnometer control system supplies the control signals to manage helium flow for the duration of experiments and acquires the resulting data.
VI. Credits
The wiki version of this document is based on the Exp. 362T document and was last edited on 6/27/2019 Exp 383. The 362T version is archived, below. Additional information from an older "Advanced User Guide" has been combined with this user guide by Susan Boehm on 383.
All improvements to the Quick Start Guides and User Guides are a communal effort, with honorable mention to the group of LOs, ALOs, and technicians who have helped.
VII. Archived Versions
- MAD User Guide - 27Sept2022
MAD_UG_v.362T.pdf: V362T→ D. Houpt, rev. M. Hastedt (1 March 2009)
1 Comment
Unknown User (25dbb4e563432e130164eb68f519000c)
Aug 05, 2018Reviewed by Nicolette 6 August 2018