Introduction
Preparing Reagents, Standards and Samples
Reagents
Dosino Reservoir:
DI water
Suppressor Rinse Solution:
0.1% methanol in DI water
- 1 mL methanol to 1 L DI water
Suppressor Regenerant Solution:
0.05 M sulfuric acid solution
- 2.7 mL sulfuric acid to 1 L DI water
Anions Eluent:
3.2 mM sodium carbonate/1.0 mM sodium bicarbonate solution
- Metrohm “A Supp 5 Eluent Snips”
- Pour contents into a 1 L volumetric flask.
- Rinse the tube with DI water, adding to the flask.
- Bring flask to volume.
Cations Eluent:
1.7 mM nitric acid/1.7 mM PDCA (pyridine-2,6-dicarboxylic acid)
- Dissolve 0.248 g PDCA in DI water in a 1 L flask.
- Add 106 µL concentrated trace metals grade nitric acid.
- Bring flask to volume with DI water.
To make a carboy’s worth:
- In a 2 L volumetric flask, mix 872 µL nitric acid, 2.272 g PDCA with DI water and bring to volume.
- This may involve using a stir plate with a stir bar in the flask. Pour into the carboy.
- Add three more 2 L flasks filled with DI water.
Standards
Prepare a standard curve, 10 mL per level, in IC vials:
standard 1 | standard 2 | standard 3 | standard 4 | standard 5 | standard 6 | Standard 7 (Pipette from DF100) | Standard 8 (Pipette From DF100) | Standard 9 (Pipette From DF100) | Standard 10 (Pipette From DF100) | |
IAPSO (µL) | 150 | 125 | 100 | 75 | 50 | 25 | 1000 | 500 | 100 | 50 |
DI water (µL) | 9850 | 9875 | 9900 | 9925 | 9950 | 9975 | 9000 | 9500 | 9900 | 9950 |
- Make sure that the vials are vortexed before analysis.
To add/edit standards, select the METHOD panel and Standards in the Evaluation window. Here you can also add/edit check standards information.
Samples
All samples are diluted 1:100 with DI water.
- Make sure that the vials are vortexed before analysis
Check Standards
- Prepare 10 check standards of DF100 by making 1 mL of IAPSO up to 100 mL with DI water in a 100 mL volumetric flask.
- Shake the flask, then decant the solution into 10 separate IC vials.
Instrument Operation
Startup
- Load a method (sets instrument’s operational parameters).
- Select METHOD icon in left panel.
- Select File -> Open -> select the method.
- You can then save the method with a new name for the current Expedition (File -> Save As).
2. Make a new database for the Expedition (saves results in a central Expedition database)
- Select DATABASE icon in the left panel.
- Select File -> Database Manager.
- Select Edit pulldown then New.
- Type in a new name.
- Here you can also make a database backup.
- Select Database Manager again and Backup, giving a unique Expedition name.
- Go back to the METHOD panel.
- In the Evaluation window, click on Results icon.
- Select the Database tab.
- Double-click on the Name Database field and select your database name for the Expedition.
3. Go back to the WORKPLACE icon in the left panel.
- Select the method that you want the instrument parameters to be set at (Equilibrium tab).
4. Confirm all reagent reservoirs are filled, peristaltic pump tubes are in good shape and their platens are engaged.
5. To start the instrument, select Equilibration tab > Start HW button.
- To shut down the instrument, select the Stop HW button.
6. Monitor instrument conditions (Watch window) for ~ 60 min before starting a sequence.
- The anions baseline should be ~ 1 µS/cm. Suppressor may cause a small peak every 10 min or so.
- The anion pump pressure should be around 6.5 – 7.0 MPa.
- The cations baseline should be ~ 870 µS/cm.
- The cation pump pressure should be around 4 – 4.5 Mpa.
- The column thermostat display appears red until reaching 45°C.
- Allow the columns to come to temperature before starting sequence.
- The anions baseline should be ~ 1 µS/cm. Suppressor may cause a small peak every 10 min or so.
Sequences
- To set up a sequence, select the WORKPLACE panel and Determination Series tab.
To create a new sample table, use the dropdown menu Sample Table -> New.
- Go to Sample Table drop-down and select Properties.
- In the Display tab, make sure that the Value 1 radio button is checked.
- Now go to the Edit tab and make sure that the Value 1 radio button is checked.
- Double click the first row to start populating the sample/sequence table.
The table should follow a basic guideline as follows (see Figure 1).
- The calibration standards will come first.
- Followed by the blank(DI used as a sample).
- A check standard.
- Then the samples.
- Checks every ten samples or so.
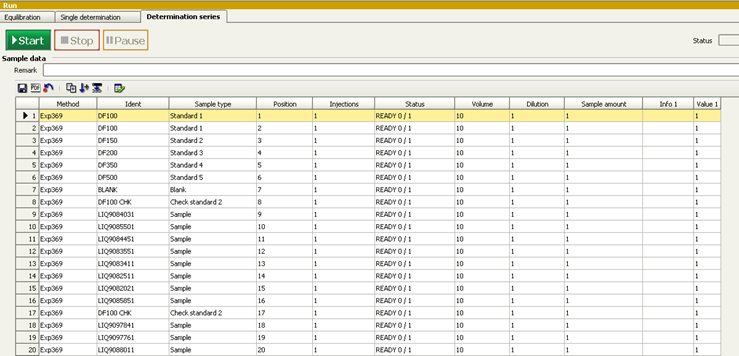
Figure 1 : Sample/sequence table example
From Figure 1:
Method : 369 (expedition number)
Ident : Text_ID of the sample. Standards are not yet entered into the LIMS so use something like DF100 or DF100 CHECK (for a check standard).
Sample Type : Sample, Standard 1–5, Blank or Check Standard
Position : Autosampler vial position
Injections : 1
Volume : 10 µL
Dilution : Select “1.” Dilution is supposed to be the dilution factor for manual or hand dilutions performed by the analyst prior to the sample being placed in the system; however, the standards are built around 1:100 being baseline, so we don’t want the software to calculate dilutions.
Sample Amount : Should be “1.”
Info : Here you can enter a comment or Label ID for example.
Value : Dosino Dilution Factor, the dilution factor performed by the automated dilution system. For hand dilution, set this to “1.”
3. After the sample/sequence table is complete, go to the Sample Table pull-down, select Save As, and give a name.
4. Place the vials in the appropriate chamber according to the sequence table.
5. Click on the Start button to start the run. A display of the current aspiration will be shown on the Live Display Window.
Evaluating Results
Viewing the calibration:
In the Database panel, select a result of interest, in the Determination Overview window.
In the Curves 1 window, are tabs for Anions and Cations. Select either, and then click on the Calibration curve radio button.
Select the element to evaluate from the pull-down menu.
Viewing results:
In the same Database panel, select a result of interest, in the Determination Overview window.
In the Curves 1 window, are tabs for Anions and Cations. Select either, and then click on the Chromatogram radio button.
You can view the chromatogram, zoom in to check integrations, etc.
The results, in a tabular text format, will be in the Results window.
LIMS
In the Database panel, select the result(s) to upload. Either click on a row or hold down the <Ctrl>-key and select multiple results.
In the top menu, select Determinations -> Export.
Select All Selected Data Records and export template Exp368P.
Click OK. The Excel csv files will be created in C:\Metrohm Export.
Copy these csv files to the MUT uploader directory (C:\DATA\in).
Run MUT to upload the results to the LIMS.
Move the csv files in C:\Metrohm Export to an Expedition folder and at the end of the Expedition copy over this folder to the DATA1 volume for backup for the shore db.
Maintenance
For maintenance, there are a couple of great guides, located in the Metrohm_backup\METROHM MANUALS folder on the desktop.
850_IC.pdf main instrument guide
IC_maintenance_guide.pdf outlines maintenance schedules to follow
: changing autosampler ultra-filtration membrane
: changing H2O and CO2 scrubbers
: replacing peristaltic pump tubing
: changing the guard/inline filters
: pump maintenance
Autosampler.pdf autosampler guide
Dosino.pdf Dosino guide
850_pump_maintenance.pdf anion/cation pump maintenance
Metrohm_parts_guide.pdf parts information to send in requisitions
Metrohm_ultra_filtration.pdf more on the autosampler’s ultra-filtration
MagICNet_tutorial.pdf software guide
Helpful Hints
Sometimes the autosampler ends at a position where some vials cannot be accessed. To get the autosampler to move, select the Manual tab on the main panel, then select 858 Professional Sample Processor. Select the Tower tab, change the rack position input, then click Start.
The business card for the Service rep is taped to the side of the instrument.
The help function in the software is good. Accessed from the top menu.
Credits
This document originated from Word document IC_QSG_369_draft.docx (see Archived Versions below for a pdf copy) that was written by L. Brandt (2013-21-08) and edited by E. Moortgat (2017-10). Credits for subsequent changes to this document are given in the page history.
Archived Versions
LMUG-MetrohmIonChromatographQuickStartGuide-230220-1909-150.pdf