Introduction
Gas bottles are stored on racks, usually eight (8) bottles of the same gas on one metal rack. If it can’t be avoided bottles filled with different gases are on one rack. The gas bottles are strapped to the rack with metal banding. The racks get shipped back and forth between shore and ship, usually to have them refilled, when empty, and/or pressure tested every 5 years. The shipment from SHORE to SHIP is a HAZARDOUS SHIPMENT because the gases are under 22 psi pressure, from SHIP to SHORE they are a regular shipment because they are empty.
In AMS, gas bottles assigned to a rack as well as single gas bottle information can be checked/edit under Shipping/Gas Bottle (top row item).
This document summarizes all necessary steps as well as knowledge that was acquired over time.
Content:
A) SAFETY - General Rules for Handling Gas Cylinders
B) Ship procedures
C) Shore procedures
D) Vendor interactions
A) SAFETY - General Rules for Handling Gas Cylinders
All compressed gases cylinders present significant physical hazards, and many of them present chemical hazards as well. Before handling gas cylinders (or racks of gas cylinders), you should be aware of the following:
- All compressed gas cylinders shall be secured with chain or strap between the “waist” and “shoulder of the cylinder at all times.
- This includes empty cylinders.
- Cylinders not currently in use must be capped.
- “In use” includes cylinders connected to equipment or processes used at least 3 times per week.
- Empty cylinders must be capped.
- Cylinders must be kept away from electrical wiring where the cylinder could become part of the circuit.
- Store cylinders in well-ventilated areas designated and marked only for cylinders.
- Store cylinders in an upright position (includes lecture bottles).
- Empty cylinders should be clearly marked and stored as carefully as those that are full because residual gas may be present.
- Mark empty cylinders clearly.
- Keep valves closed on empty cylinders.
- Protect cylinders from corrosive vapors and sources of heat.
- Do not store cylinders in egress areas near emergency exits, hallways, or under stairs.
- Do not keep cylinders more than 5 years past their hydrostatic test date (see receiving cylinders, below).
- Inspect all cylinders upon delivery for valve protection and hydrostatic test date, which should be within the past 5 years. The hydrostatic test date will be stamped into the collar of the cylinder.
- A stamp of 2MM84+ indicates that the cylinder was last hydrostatically tested in February of 1984; “MM” are the inspector’s initials: “+” indicates that it is authorized for charging up to 10% in excess of its marked service pressure.
- Retest stamps should also appear on the neck or shoulder of the cylinder : 4L02* means that the cylinder was re-tested in April of 2002 at facility “L”. A star after this number means that the cylinder has a 10 year retest cycle, rather than a 5 year cycle.
- Do not accept the cylinder past its hydrostatic test certification
- Do not keep a cylinder past its hydrostatic test certification. (This is due to Department of Transportation regulations- it is not legal to transport a cylinder that is out of date, so technically, the gas supply company can’t remove it if it is out of date.)
- Check the cylinder’s service pressure. This will be found on the collar opposite the hydrostatic test stamp. This stamp will have 3 lines and may look something like one of the following:
Receiving Cylinders
DOT3AA2265
K16110
BTWECO
- The first line means that the cylinder meets US Department of Transportation Specification 3AA and has a service pressure of 2265 psig at 70 degrees F.
- The second line is the manufacturer’s serial number.
- The third line is the manufacturer’s unique symbol.
- Do not accept cylinders unless they are clearly labeled as to their contents. NEVER rely on cylinder color as an indicator of the cylinder’s contents!
- Cylinder caps and valves should not require anything more than hand pressure to open- do not accept the cylinder if this is not the case.
Cylinder Storage: Chemical Compatibility
Cylinders must be stored in compatible groups:
- Keep flammables separated from oxidizers: Keep oxygen cylinders a minimum of twenty feet from flammable gas cylinders or combustible materials. If this cannot be done, separation by a non-combustible barrier at least 5 feet high having a fire-rating of at least 0.5 hours is required.
- NOTE: This applies to cylinders in use, “back up” cylinders stored in labs, and “empty” cylinders.
- Keep corrosives separated from flammables or oxidizers (20 feet in outdoor storage area; does not apply when cylinders are indoors in gas cabinets).
- NOTE corrosive gas cylinders are not allowed indoors unless they are in gas cabinets.
Moving/Transporting Cylinders
- Never move a cylinder that is not capped.
- Always use a cylinder cart to move cylinders from place to place, do not roll or “twirl” them from one place to another.
- Don't use the protective valve caps for moving or lifting cylinders.
- Don't drop a cylinder, or permit them to strike each other violently or be handled roughly.
- Moving cylinders and dewars on elevators
- Whenever possible use freight elevators
- Do not allow other people to ride the elevator with the gas cylinder- politely ask them to wait for the next elevator.
- Here’s a demonstration of what can happen when an un-capped cylinder is damaged: http://www.youtube.com/watch?v=ejEJGNLTo84
- Same thing- a safety issue for all you SCUBA divers out there: http://www.youtube.com/watch?v=tyINNUaXa8Q&NR=1
Labeling Cylinders
- The cylinder, not the cap, must be labeled as to the contents and supplier.
- Do not rely on cylinder color to identify cylinder contents: color coding is not universal and varies from one supplier to another.
- Cylinder labels must be facing out so as to be visible to lab inspectors and emergency responders.
- EHSA labels for gas cylinders should be affixed to the wall (preferable) or kept in a notebook in the lab. Gas cylinders use the “green label” system for high through-put chemicals: the label stays on the wall, even when the gas cylinder is changed out. There is no requirement to remove the old cylinder from the system and re-enter the new cylinder every time the cylinder is changed out as long as the replacement cylinder has the same contents as the original.
Cylinder Fittings/Gas Tubing
- Cylinder fittings vary between gas types, inert, oxidizing, corrosive, and flammable.
- Never use grease or PFTE/Teflon™ tape to force a fitting—you may be putting together two types of incompatible fittings!
- Always use non-sparking tools (brass or aluminum) to work on flammable or oxidizing gas fittings.
- Fittings and tubing must be compatible with the gas. For example, CGA 580 fittings are only for inert gases like helium or argon.
- Flammable and poisonous gases may only be used with stainless steel tubing.
Regulators
- Must be marked for the maximum cylinder pressure. Cylinder pressure may not exceed 75% of the regulator’s maximum rated pressure.
- Must be equipped with two gauges: one to show the cylinder pressure and the other to show the outlet pressure. An exception to this are the single stage regulators often used for corrosive gases.
- Never use an adapter between the regulator and the source cylinder! The gas fittings are deliberately different in order to protect you from hooking up the wrong gas to the wrong outlet!
- Never use an aid, such as PFTE/Teflon™ tape to connect a regulator to a cylinder. The fitting must fit and seal without such an aid.
- After attaching a pressure-reducing regulator to a compressed gas cylinder:
- Turn the regulator adjustment screw out (counterclockwise) until it feels loose.
- Stand behind the cylinder with the valve outlet facing away from you and observe the high pressure gauge on the regulator from an angle, never pressurize a gauge while looking directly at it.
- Open the valve handle on the gas cylinder slowly until you hear the space between the cylinder valve and regulator fill with gas. (You can also watch the pressure rise on the high pressure gauge. If you turned the adjustment screw properly, there should be no gas flow out of the regulator and no pressure rise on the low-flow pressure gauge.
- When you are ready to use the cylinder, open the valve until you feel it stop, then turn it back one-quarter turn.
- If the regulator does not come with a hand wheel, the wrench needed to open it must be left at the cylinder so that it can be closed quickly in the event of an emergency.
Cylinder Use
Be sure all connections are tight. Use soapy water to locate leaks.
- Keep cylinders valves, regulators, couplings, hose and apparatus clean and free of oil and grease.
- Keep cylinders away from open flames and sources of heat.
- Safety devices and valves shall not be tampered with, nor repairs attempted. Use flashback arrestors and reverse-flow check valves to prevent flashback when using oxy-fuel systems.
- Regulators shall be removed when moving cylinders, when work is completed, and when cylinders are empty.
- Cylinders shall be used and stored in an upright position
- The cylinder valve should always be opened slowly. Always stand away from the face and in back of the gauge when opening the cylinder valve.
- When a special wrench is required to open a cylinder or manifold valve, the wrench shall be left in place on the valve stem when in use; this precaution is taken so the gas supply can be shut off quickly in case of an emergency; and that nothing shall be placed on top of a cylinder that may damage the safety device or interfere with the quick closing of the valve.
- Fire extinguishing equipment should be readily available when combustible materials can be exposed to welding or cutting operations using compressed cylinder gases.
- Welding and cutting operations in labs require a Hot Work Permit in accordance with university and/or shipboard regulations.
B) Ship procedures
Marking/color coding/storage
Gas bottle racks are mainly stored on the UpperTween Deck on the Joides Resolution. Some gas bottles are located in the labs (i.e. chemistry). A gas bottle inventory is kept at this location on the server: ALO/Logistics/Gas Bottles and is updated each expedition/crew change, when changes occur.
Take pictures of all gas bottle racks that get received on the ship as soon as they come out of the container.
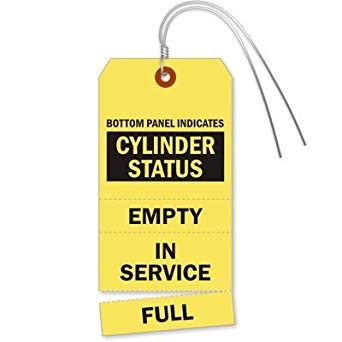
All gas bottles receive a yellow tag when they arrive on the JR. The tag is labeled with the expedition, that it was delivered to. When the gas bottle gets hooked up to the system, the first part of the tag (FULL) gets pulled off, so that the tag displays that the gas bottle is IN SERVICE. Once that bottle is empty, the IN SERVICE tag should be removed and the status EMPTY will be displayed. Write purged on each bottle tag, once the gas bottles on the rack were purged on the dock/before it gets loaded into a container.
Gas bottles are color coded on the neck of the cylinder based on their gas content:
Argon – Brown
Helium – Yellow
Oxygen – White
Like every other supply, gas bottles get cycled through, so that the oldest on board get used first and the newly delivered should be stored to be used last (at the back of the gas rack assemblage).
Shipping to shore
When a gas bottle rack is prepared for shipment back to shore, each cylinder is vented outside (either on the dock or on the landing). When venting out cylinders ALWAYS open the bottle slowly and control the noise level.
When preparing shipping gas racks, the following procedure shall be followed in AMS:
1) Gas bottles are usually sent in the SURF container (shipment).
2) Use the 'Gas Bottle' function to add a gas bottle rack (pallet) to that shipment. This function will automatically fill in the gas bottles on the rack.
C) Shore procedures
Banding
The location and amount of banding used on the gas bottle racks has varied over time. In order to streamline that process, the following banding SOP should be used (see Fig. 1):
Use ¾ “ banding for green banding, and 1 1/2" banding for the grey banding.
Rotate the gas bottles, so that the cylinder valve/outlet is rotated outward for easy connection in the lab.
Place the first four straps around a cluster of 4 bottles, one cluster right, one cluster left. The banding needs to go through the inside bars of the rack if possible. Place two straps on the top 3rd and two straps on the lower 3rd of the rack (See Fig. 1).
The next step is to strap the 2 clusters together and should go around the outer part of the rack. Use one strap just above the upper strapping and one strap above the lower strapping.
Stencil “DO NOT CUT” on the outer two straps.
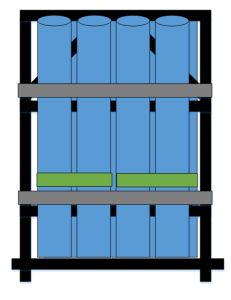
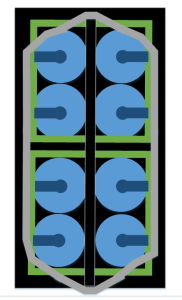
Fig. 1 Gas bottle rack side and top view. Rack - black, Blue - gas bottles, Green - banding, Grey - banding.
One page PDF instruction HERE.
D) Vendor interactions
Pressure testing and refill
The gas bottle cylinders have to be hydro tested (pressure tested) every 5 years. The hydrostatic test date will be stamped into the collar of the cylinder (for more information, see SAFETY paragraph).
AMS/warehousing process to refill gas cylinders that are used on the ship:
In an effort to more accurately track the usage and cost of the gas cylinders by AMS inventory numbers, the procedure described below will be used.
The TAS business coordinator (John Miller) will be responsible for working with the vendor to fill the cylinders and see that these are returned to IODP in a timely manner.
When IODP gas cylinders, used in the labs onboard the ship, return in the surface shipment from a port call, they will be sent to a vendor to be refilled.
1) When the cylinders arrive, the supervisor of technical services (Brad Julson) and the TAS business coordinator (John Miller) will be notified and a requisition will be prepared in AMS, using the gas rack numbers (GR numbers), or for individual cylinders, the gas bottle (GB) numbers. The costs can initially be entered as $1 until the actual statement arrives with actual costs.
2) Once the requisition has been prepared, the vendor will be notified to pick up the cylinders by the warehouse man/IODP dock.
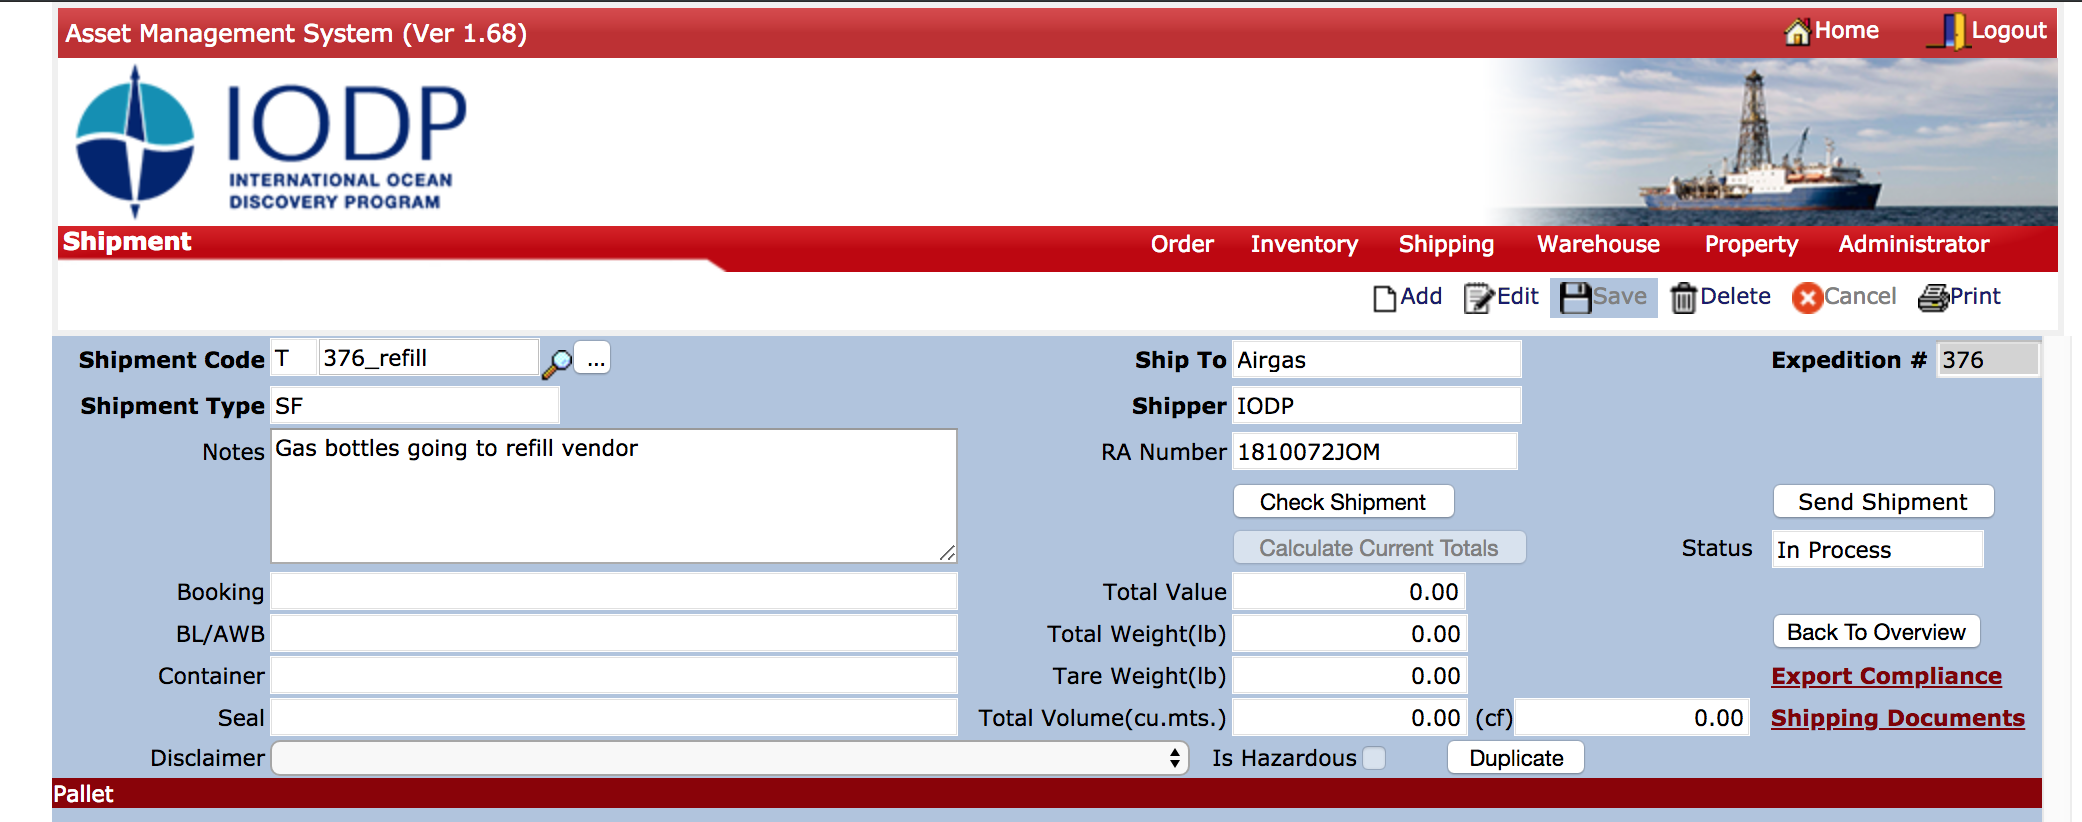
ADDED: The warehouse man/IODP dock prepares shipping papers to send the racks/cylinders to be refilled (see Fig.). The papers will be created as shore shipment under the expedition that the gas racks came back from. The shipment fields should be populated as follows:
Shipment Code: XXX_refill (XXX - the expedition # that the gas rack came back from)
Shipment Type: SF (surface)
Notes: Gas bottles going to refill vendor
Ship To: Airgas
Shipper: IODP
RA Number: XXXXXX (REQ # that was created for the refill, can be inquired from TAS Business Coordinator or looked up under Orders/Requisition).
The shipment should be sent, when the vendor picks up the gas racks.
When the vendor takes the bottles to be refilled, the vendor must produce a receipt indicating which gas racks and gas cylinders have been picked up, both by the IODP gas rack /gas bottle number as well as the serial numbers. This receipt must be scanned and entered into AMS as an attachment for the requisition (REQ).
The status of the REQ will be changed to “On Order”. When an employee views the gas rack in Item Inventory, it will indicate that the gas rack is on order, which indicates that the gas rack is out for refill at the vendor.
3) When the refilled gas racks/cylinders are returned to IODP by the vendor, these must be checked in as received in the AMS requisition. The packing slip from the vendor must list the bottles by AMS GB and GR numbers, as well as by serial numbers. This receipt must be scanned and entered into AMS as an attachment for the requisition.
ADDED: The warehouse man/IODP dock will NOT receive the racks back in AMS.
The packing slip will be given to John Miller and when the statement arrives from the vendor, the AMS requisition will be invoiced with the actual costs. This will ensure that we can track gas racks/cylinders location and usage.
The status of the gas rack, when viewed in Item Master, will now show up in the “Qty On Shore” field. Similarly, when the gas racks are allocated to a shipment, or are in the shipment to the ship, these will show up in the “QTY Allocated” and “Qty In Transit” fields in the Item Master screen.
Question:
How do I know if a gas rack is in the shipment back to shore?
Stencils of GB# and Serial# - get spray paint for it, get stencils